Friday, August 23, 2013

Pork Chops and Beans

This is one of my husband's favorite meals.

This is also one of those recipes that I've tweaked practically every time I've made it. You can tweak it to suit your family, too. For instance, if you aren't fond of pork chops, you can use chicken (legs, thighs, tenders, etc.). If you don't like kidney beans, then just use all Ranch Style Pintos. Totally up to you.

Pork Chops and Beans


Splash olive oil
1/2 cup chopped onions
6 pork chops
3 cans Ranch Style Pinto Beans
1 can kidney beans
1 can black beans
1 small can mild chopped green chilies
1 can chicken broth
1 cup barbecue sauce (I use whatever kind happens to be open in the fridge)
1/4 cup prepared mustard
1-2 tablespoons minced garlic (why yes, I do buy the large economy sized jars!)
salt and pepper to taste (we use Montreal Steak Seasoning)

I use a large electric skillet to prepare this meal

Heat oil in skillet
Brown onions and pork chops
Mix the mustard, barbecue sauce, broth, minced garlic, and chiles with two cans of the beans and pour over the chops in the skillet
Add the remaining cans of beans and stir to mix
Let simmer until the pork is tender and done, about 45 minutes
Stir occasionally to avoid sticking
Serve with a nice green salad

You can mix and match beans, but I'd use at least two cans of the Ranch Style Pintos.
Omit the chiles if the family doesn't like them.


I'm going to give it a rating of FIVE, but have to confess that two of the children will only eat the beans and one will only eat the pork! So that evens out to FIVE, right?

Wednesday, August 21, 2013

Microwave Caramel Corn

Fifteen years ago a lovely friend, Debbie Burgett, gave me a recipe for Microwave Caramel Corn. This stuff is heavenly! It was medicinal during some edits that I've done. Got me through them. I'd edit a couple pages, grab a handful of this, pace around the house...then get back to editing. Yep, medicinal!

This is the closest thing to Cracker Jacks that I've ever seen. I think it's the baking soda that makes the kernels separate.


Debbie Burgett's Microwave Caramel Corn

2 bags microwave popcorn (we use the air popper and guesstimate amounts)
1 1/2 cups of peanuts (optional)
1 cup packed brown sugar
1/2 cup butter
1/4 cup corn syrup
1/2 tsp salt (we don't add this)
1/2 tsp baking soda
 
Pop corn and place half in a large brown paper bag
 
Combine butter, sugar, syrup and salt in a large microwaveable bowl
Microwave on high for 3-4 minutes, stirring after each minute
 
Once it comes to a boil, microwave for two more minutes
 
Remove from microwave and stir in baking soda
 
Pour half of the mixture over the popcorn in the bag
 
Put the rest of the popcorn in the bag and cover with the remaining mixture
 
Close bag and SHAKE WELL
 
Microwave for 45 seconds and SHAKE again
 
Microwave for 45 seconds and SHAKE again
 
Microwave for 45 seconds and SHAKE again
 
Pour into a roasting pan
 
Cool and stir to separate kernels
 
YUMMY!
 
WARNING: The butter, sugar, and syrup mixture is VERY HOT. BE CAREFUL when pouring it over the popped corn. I try to make sure that I don't get any on the SIDES of the bag. It's never happened, but I worry about the bag catching fire. Nope, hasn't happened, but I worry anyway.
 
Options:
 
Add cereal to the popcorn. Quaker Oat Squares are a yummy alternative.
MIXED nuts makes a fun crunch.
 
HALF this recipe is more than enough for two hungry people.


Saturday, August 17, 2013

Creamy Shrimp Stir Fry

A couple years ago I was handed a really good coupon for a Philadelphia Cream Cheese cooking sauce. I made a shrimp dish with it. It was yummy. BUT, the prepared sauce base is kind of pricey. So, of course, I tweaked around and came up with my own version of it. As always, if there are some ingredients that you or your family won't eat, substitution is allowed...and encouraged!
 
Bethany helped me make this today.


Creamy Shrimp Stir Fry

splash of olive oil
4 tablespoons Smart Start or Butter
2-3 small fresh yellow squash (sliced) or one package frozen (thawed)
2-3 smallish zucchini (sliced)
2-3 red or orange bell peppers, chopped
12 ounce bag frozen shrimp (thawed)
8 ounce Philadelphia Cream cheese (we use the LIGHT)
1-2 tablespoons minced garlic to taste
salt and pepper to taste
1 package egg noodles cooked according to package

Heat a good splash of olive oil in a deep frying pan. Mine sort of looks like a Wok.
Saute your zucchini, squash, garlic and chopped peppers in the oil.
Add the butter and let it continue cooking until the veggies are done enough for your family.
Turn the heat down to medium and add the shrimp and cream cheese.
Season to taste with salt and pepper.
Stir to combine.
DO NOT LET THIS BOIL. Boiling cheese products tends to make them separate and it is very unappetizing.

Serve over egg noodles or rice.

Options:

Use all squash or all zucchini (today's picture is all squash)
Use assorted colors of bell peppers
Use chicken (cooked) instead of shrimp
All of your veggies can be fresh, or they can be frozen


My family loves this.
It is a FIVE out of FIVE from us:

Wednesday, August 14, 2013

Follow me via Bloglovin!


I'm setting this blog up with Bloglovin, you can join me via them! There's a button on the upper right...


<a href="http://www.bloglovin.com/blog/10326529/?claim=bbj5asr66h4">Follow my blog with Bloglovin</a>

Tuesday, August 13, 2013

Chicken Enchiladas

We quite often get one of those rotisserie chickens from the commissary. In fact, we sometimes get two. One to eat right away and one to pick the meat off to go into a family favorite, chicken enchiladas.

I've made this recipe so many times, I don't even have to hunt the printed copy down. All of the girls know how to make it, too. If you don't want to use the rotisserie chicken, you can just cook some breasts, boneless thighs, or tenders and shred them. I find that if you are going to cook the chicken yourself, boiling the meat with the bones and just a bit of skin gives the meat a better flavor.


Chicken Enchiladas

Heat oven to 350
Grease a 9x13 baking pan

2 cans cream of chicken soup
8 ounces sour cream (we use the light)
2-3 cups shredded cooked chicken meat
1 small can mild chopped chilies
1 cup shredded cheese, separated
10 soft flour tortillas (we use the plate sized ones)

In a small bowl mix the soup, sour cream and 1/2 cup shredded cheese.
Put about 3/4 of that mixture in a larger bowl and set the smaller bowl aside.
Add the chicken to the mixture in the larger bowl and combine


Place a thick line of the mixture on the tortilla, roll it up, and place it in the greased pan. You can make them fit pretty tightly.

Once all the tortillas are filled and rolled, take the small bowl of filling and cover the tortillas. Make sure you get the filling clear to the edges.

Sprinkle with the rest of the cheese. I didn't specify what kind of cheese to use. Just use whatever kind you like best. When I made this today for my husband's birthday, we used a mix of four different kinds.

If your family likes things more cheesy, use more!

Bake for about 30 minutes. The edges should be a bit bubbly and the cheese should be nice and melty. This doesn't really need to be cooked; it just needs to be heated all the way through.

You can adjust how much filling goes in each tortilla. You can choose to make them a bit leaner...or a bit plumper. Totally up to you.

Sorry, forgot to get a picture when it was done. Will add one the next time we make it!

This one gets a FIVE from the whole family:

Sunday, August 11, 2013

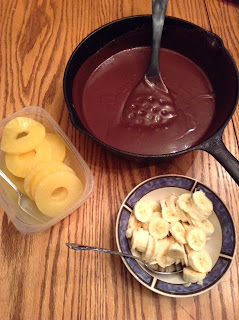
Easy Chocolate Sauce

Easy Chocolate Sauce

A very long time ago, when my mom lived in Seattle, she had a "Banana Split Dessert" at a friend's house. When we came to visit, she made it for us. While the bananas and ice cream were tasty, it was the sauce that was over the entire thing that made the biggest impression on us.

Since then, we've made just the sauce many, many times. We ladle it over Angel Food Cakes. We drizzle it over a cake that has vanilla frosting. One time a child chose chocolate cake, with chocolate frosting, with chocolate sauce  for her birthday cake!

Once I used it in a medicinal way. Delaney was a wee babe and it was time for her to learn to fall asleep on her own. As she lay grizzling away in her crib, I made a pot of chocolate sauce and ate it by the spoonful while she learned to sleep. Yes, it was medicinal.

Today is Delaney's Child of God Day. That's the anniversary of her Baptism Day. The girls get to choose dessert for their Child of God Day. Delaney chose CHOCOLATE SAUCE. She suggested we just eat it with spoons. Bethany pointed out that we have bananas and pineapple slices. Therefore we sang "Jesus Loves You" and had chocolate sauce with fruit. It was a good dessert.


Chocolate Sauce

1 cup chocolate chips

½ cup butter

2 cups powdered sugar

1 ½ cups evaporated milk

Melt chocolate chips and butter.  Add powdered sugar and evaporated milk.  Cook until thick and smooth, stirring constantly.

Remove from heat and add 1 tsp. Vanilla


We cook it in a heavy cast iron skillet over medium heat.

This is great over ice cream, too.

This is a family rating of:

Wednesday, August 7, 2013

Molasses Oatmeal Whole Wheat Bread

My first recent attempt at bread in the machine was the King Hawaiian Bread. It turned out great but I wanted something more "food" like. Something a bit more robust. Maybe with a bit of fiber, too. Hubs has been reading about quinoa flour. Quinoa is pronounced "kinwa." It adds protein to your baking. It's a bit pricey, but we thought we'd give it a try. Let me state for the record that we'll never be using this in any large amount. The aroma and flavor is something like peas, mixed with RAW garbonzos, with a slice of something, grass, maybe? and it's not my idea of yummy. BUT...I feel all healthy-ish when I add a scant 1/4 cup to this bread recipe. The molasses and oats override the flavor. I wouldn't use it in the KHB, though. That flavor is quickly overwhelmed by the quinoa.

I'll say it now, the whole family LOVES this bread.


Molasses Oatmeal Whole Wheat Bread

2 cups of flour (I use all purpose, unbleached flour and never have a problem, but some swear by BREAD flour)
1 1/4 cup whole wheat flour
1/4 cup of quinoa flour (if you choose NOT to use this, just up the whole wheat flour by 1/4 cup)
1 package of yeast (2 1/4 teaspoons of the loose variety)
1 cup warm water
1/2 cup quick oats
1/4 cup molasses
3 tablespoons of butter, softened
1/2 teaspoon salt
1 egg

I add all of the wet ingredients first (water, molasses, butter, egg). Next, I add the dry ingredients and then I press a dimple into the flour with my finger. This is where you place the yeast.

If we want the bread during the day, I use the rapid setting on the bread machine and we have bread in 2 hours and 50 minutes. I've also set this to be ready at 5:30 in the morning. Some worry about the egg sitting in the machine for that long, but I've never had an issue with it.


Since my loaves tend to be tall, I cut them in half, then cut starting at the corner. Makes for even, although not equal, slices.  This is particularly good toasted.
After we slice it, we store it in the refrigerator in a zip-lock bag. With no preservatives, this will mold on the counter...if it lasts that long! 

Yes, the family rating for this is:


Saturday, August 3, 2013

Roasted Veggies

At one of the Chinese restaurants that our family likes to visit, they have these green beans that are heavenly. Kind of crispy and roasted, with some garlic bits stuck to them.

A google search and I had the basics of making some of my own. When I shared a post on Facebook that a friend had posted, I was told that ANY veggie can be roasted. You know I had to try it.

I've roasted fresh green beans twice and frozen ones twice. And they all disappeared quickly.

Today I'm trying frozen broccoli and a yellow squash. It smells so good! This is going to be one of those recipes where nothing is set in stone...or measured out exactly.


Roasted Veggies

A bag of frozen broccoli (or a stalk of fresh, cut into pieces)
One medium yellow squash (or a zucchini!) sliced thin

In a bowl mix together about 1/4 cup olive oil and a heaping tablespoon of minced garlic (and I did use a TABLE spoon, not a measuring spoon. You can add more or less garlic to taste. We LOVE garlic, so the more, the better)
Put a couple "grinds" of sea salt and fresh pepper (I have a salt grinder AND a pepper grinder)

Toss the veggies in the oil mixture and spread on a cookie sheet
Sprinkle with "some" Parmesan cheese, use your best judgement about how much ;)

Bake at 375 for 30 minutes
Stir the veggies around at 15 minutes


Now, you can use ONE kind of veggie or mix and match. I've used fresh green beans and also a bag of frozen. It was all good. This combo (the broccoli and yellow squash) was quite lovely.

My best guess is that if you use FRESH brocoli, the pieces would be more "crunchy." But I have to say, this with the fresh squash and frozen brocoli was really tasty.


The Family gives this
FIVE out of FIVE!

Thursday, August 1, 2013

King Hawaiian Bread

 
Although I've owned a bread machine for something like fifteen years, it's been living in a cabinet in my garage for about fourteen of those years. I've moved it from Germany to Oklahoma, to Florida, and then to two more houses in Oklahoma.

A recipe for King Hawaiian Bread, made in a machine, caught my attention recently and I pulled the dusty machine out. Got it all cleaned up...and made bread. That was about twelve loaves ago!

There really is nothing like the smell and taste of fresh, hot bread.

The recipes that I saw for KHB were all white and I wanted to give ours a bit more "food value" so I (say it with me) tweaked the recipe.

King Hawaiian Bread

1 cup warm water
1/2 cup sweetened condensed milk (you can use low or no fat, but I use the REAL stuff)
2 tablespoons butter
2 cups white flour (I use unbleached)
1 1/3 cup whole wheat flour
2 1/4 teaspoons yeast

I put the wet ingredients in my bread machine first
Next I put the flours
Last, make a dimple with your finger in the flour and put your yeast there

Because we can't wait, I use the "rapid rise" setting on my Hitachi Bread Machine and in 2 hours and 50 minutes we have a fluffy, yummy loaf of bread.

To cut it in manageable pieces, I lay it on it's side and cut it in half. Then I start cutting at a corner and make slices. Yes, this won't make nice even pieces for sandwiches, but we don't mind eating odd shaped ones!


The family rating for this is...
 
FIVE OUT OF FIVE!

I'll be posting my Whole Wheat Molasses Oat Bread in the next day or so. It's yummy, too!