Showing posts with label Baked. Show all posts

Sunday, January 11, 2015

Naked Wedding Cake


My eldest daughter, Amanda, was married on December 23 to her Marine, Tyler.

During the planning for the wedding, she told me she wanted me to make her wedding cake. I'd made my own, using tips gathered when I worked at The Flying Dutchman in Anchorage, Alaska. I had confidence I could do this for her. Then she said she wanted a Naked Wedding Cake. Wait, what?

A Pinterest search later, and I had a grasp of what was going to be needed. NO FROSTING! For a Rustic Look. During our search, we spotted some pine cones as a cake topper with a little top hat and a veil. We immediately tweaked the idea (when haven't we tweaked?) and her sister, Bethany, and I decided to make a Marine Corps Cover and a Nurse's Hat with a veil out of FIMO clay. Tyler sent me pictures of what his hat looked like so we were making the right version. We then found the perfect candle ring to surround the two pine cones. At Target we found the cutest little red berry picks that we then placed around the base of the cake. We lightly glued the topper to a cardboard circle that we then placed on the cake.


After the wedding we glued the pine cones to a base for display in their new home.

I made my own cake pan wraps out of towels to help the cake bake more evenly. Will admit to having made a couple test cakes! I was worried that the cake would get those dry, crunchy edges once we set it up. So one test cake was left on the counter for the day. It actually stayed nice and moist! I had read that if one used the bigger pans, one would need "cores" to make the centers cook clear through. I didn't need it for the 12 inch layers. We used a 14 inch Wilton plastic footed circle under the bottom cake as a base.

For the bottom layer, Amanda chose Black Forest Cake. I mixed and baked two cakes mixes separately in the 12 inch pan. And instead of using oil, I melted butter and added a splash of vanilla to the chocolate fudge mix. I read where one should use HOT water in a chocolate cake mix as it activates the chocolate. I don't know if that's true, but I did it. And the cake tasted great.

The middle layer was Red Velvet Cake. Again, I mixed and baked the two layers separately and used butter in the mix instead of the oil. The pan I used was a 10 inch pan.

The top layer was Italian Cream Cake from scratch. The recipe can be found here: Italian Cream Cake. I used 8 inch pans for the two layers (while I usually use three pans when I make the recipe). These two I baked in the oven at the same time.

I made the cakes the week before the wedding. When each layer was totally cool, I placed it on a cardboard circle and double wrapped it in cling wrap and froze them. Yes, we had tested the method earlier. The test cakes thawed out nicely. I also tested the way the cake topper would fit on the top layer.


While the layers were naked, we used homemade cream cheese frosting for the filling on all three cakes. It was just softened cream cheese, powdered sugar, butter, and vanilla. The day before the wedding, I put the layers together with their fillings while they were still frozen, and then re-wrapped them and put them back in the freezer.

I added pureed cherry pie filling to a dollop of the frosting for the Black Forest Layer. First though, I piped a dam of frosting around the edge of the bottom-most layer to keep the filling from spilling out. I made a sort of pattern with little "puffs" of frosting.

The Red Velvet and Italian Cream cakes had the cream cheese frosting between the layers. I also "puffed" out the frosting to keep the pattern the same between the layers on the entire cake.

From my research, I knew to use wooden dowels for support. That Italian Cream cake, in particular, is very heavy! After I got the layers together and placed on cardboard circles slightly smaller than the cake itself, I measured and cut the dowels and poked them through the two stacked layers. I used at least six in each one, making sure to put one in the middle of the cake. I cut them off just a smidge above the cake so that the cardboard would sit on the dowels, and not on the cake below it. The dowels keep the layers from SLIDING apart! We certainly didn't want the WEDDING CAKE sliding!

We took the frozen layers to the church on the wedding day. I set the cake up about two hours before the ceremony. We sprinkled powdered sugar (and I wish I had sprinkled a thicker layer) over the entire thing, then set the cake topper on it.

The Italian Cream cake was still a bit frozen when my new son-in-law started the traditional cut. He had to work at it a little bit! The other layers had thawed enough for our wonderful wedding coordinator, Thersa, to slice it for our guests. The guests liked having the choice of what kind of cake to eat. And they were welcome to have seconds or thirds. We had about 80 people at the reception, and still brought home about half the cake! We froze the leftovers and have been consuming it slowly.


We are very pleased with the outcome. Everyone loved the cake topper. And people raved over the taste of the cake itself.


Photo credits go to me, Pam R., and Marissa.

Friday, January 3, 2014

Molasses Sugar Cookies

Another recipe from the White River. Doug's mom used to make these and Myra passed the recipe along to me when I was wrangling horses for them.

Molasses Sugar Cookies

Doug Vaden on the White River


Cream Together:
1 1/2 Cup Shortening
2 cups sugar
1/2 Cup molasses
2 eggs

Sift together and add to above:
4      Cups flour
4      Teaspoons baking soda
2 Teaspoons cinnamon
1 Teaspoon ground cloves
1 Teaspoon ginger
1 Teaspoon salt

Mix well
Form into 1 inch balls and flatten with the bottom of a glass dipped in sugar or roll out and use cookie cutters. 
Bake at 375 degrees for 8-10 minutes


Half recipe:
3/4 Cup Shortening
1 cup sugar
1/4 Cup molasses
1 egg

Sift together and add to above:
2   cups flour
2 Teaspoons baking soda
1 Teaspoon cinnamon
1/2 Teaspoon ground cloves
1/2 Teaspoon ginger

1/2 Teaspoon salt

We like to cut out bears and decorate them. We've also made house fronts and little houses with this dough and decorated them. We all love this cookie. One thing, when we do use cutters, we don't reuse the rolled dough. We just bake off the little bits and eat them. Too much flour added, like you need when you re-roll the dough, makes it tough and not quite as tasty.


This cookie will keep for ages in a zip-locked bag or airtight canister. They are really yummy dunked in coffee.

Thursday, January 2, 2014

Easy Chocolate Roll-Up

I received this recipe when I was working as a horse wrangler at a hunting lodge along the White River in Alaska. Doug Vaden's cook, Myra, gave it to me. This is a staple of our Christmas celebrations. This past year I made three.


White River Valley, Alaska
Easy Chocolate Roll-Up
Kathie L. Spitz

PREHEAT OVEN TO 375 degrees

FILLING:
1/4 cup butter
1 1/3 cups flaked coconut
1 cup chopped pecans or walnuts
1 can Eagle Brand CONDENSED Milk (not evaporated)

LINE 15x10 inch cookie sheet (WITH SHORT SIDES) with tin foil
SPRAY with PAM
MELT butter in pan in the oven, watch carefully.
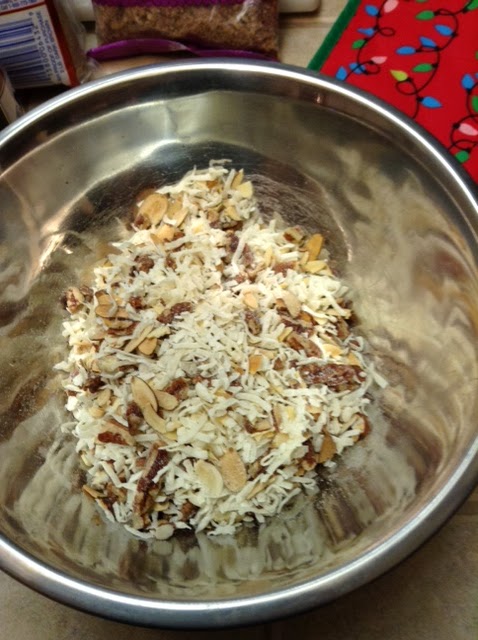
REMOVE from oven and SPRINKLE the melted butter with nuts and coconut
DRIZZLE with entire can of condensed milk, make sure to get to the edges in the corners
SET ASIDE


Cake Batter:
2      eggs
1 cup sugar
1/2 cup cocoa
2/3 cup flour
1/4 tsp salt
1/4 tsp baking soda
1 tsp vanilla
1/3 cup water


BEAT eggs by hand
ADD all the rest and BEAT by hand together
POUR evenly over butter/nut/coconut/milk mixture in pan
BAKE at 375 degrees for 18-22 minutes

DO NOT OVER BAKE

SPRINKLE immediately with powdered sugar
COVER with a SMOOTH tea towel or pillowcase
TURN the pan over CAREFULLY
REMOVE the tin foil IMMEDIATELY
Starting with the 15 inch side ROLL UP TIGHTLY, jelly roll fashion
BE SURE AND MOVE THE TOWEL!!!!! Pictures below
LEAVE wrapped until cool
SLICES easier when totally cool


I like to mix the coconut and nuts together before I sprinkle it on the melted butter.
Besides pecans or walnuts, we've also used sliced almonds and pecans.
Totally YOUR choice of nut...

Make sure to get the filling mixture clear to the edges

Again, make sure the sweetened condensed milk is evenly drizzled over the filling mixture

I also like to mix the flour, sugar, soda, salt and cocoa together in a small bowl before I add it to the beaten eggs

This is one batter we don't like to lick the bowl over as it's a bit bitter from all the cocoa. Pour it evenly over the condensed milk and filling mixture. 


Hmmm...looks red, don't know why...


When it's done (don't over bake!) IMMEDIATELY sift some powdered sugar over the hot cake.

Then place your pillowcase or smooth towel over the sugared cake and 
FLIP it over onto a flat counter.

QUICKLY and CAREFULLY remove the hot pan

...and IMMEDIATELY peel the tinfoil off the hot cake. 
You may have to use a knife to put some of the sticky filling back onto the cake

Then you start rolling the cake along the LONG side. This is the "magic" part. DON'T ROLL THE TOWEL INTO THE CAKE. 
Why yes, I am using my TEETH as a third hand. 

Roll it somewhat tightly, using your hands to keep the roll smooth and compacted. Continue rolling until it's all neat and tidy.

Finish by continuing to roll the towel AROUND the hot roll-up.
Leave it on the counter until it's cool.
Or...leave it for a short while, until you can't stand it anymore, 
and then unroll the towel and cut a slice...or three...off and eat!

It does cut MUCH easier when it's very cool.
Having a glass of hot water to dip your knife in (then wipe the water off) 
makes it easier to slice, too.

My children always used to think it was MAGIC...the way the towel didn't roll into the cake. 

This one is a FIVE STAR RATING from the entire family. 
We hope you enjoy it too!


Friday, December 27, 2013

Steamed Cranberry Pudding

Steamed Cranberry Pudding sounds "not so good," doesn't it? Steamed pudding? With cranberries? And just LOOK at it, it looks like, gasp, FRUITCAKE:

Many years ago, a lovely friend of ours, Mary Ellen St. John, of Wenatchee, Washington, made this dessert. My mom pushed her slice around on her plate for several minutes, trying to get the courage to taste it. She had said something like, "Icky, this looks icky."

After taking a deep breath, Mom took a bite. And then another. Once finished, she asked Mary Ellen for another slice. And she said, "No, make your own." At least she did give us the recipe and it's now a staple in our holiday baking. We had it for our Christmas Dinner Dessert this year for the umpteenth time.

That "icky" response is generally the one we get when we make this and people see it for the first time. It does look like fruitcake, which is not the favorite of a majority of people, if my unscientific poll is even close to the truth.

But one taste of this usually means that people are asking for more. They also tend to lick their plate when they think no one is looking.

The recipe is incredibly easy. And I hope you let me know if you liked it.


Cranberry Pudding

Ann Morrow from Mary Ellen St. John


PUDDING:
1 1/3  Flour
2 tsp baking soda
1/3 cup hot water
½ cup molasses (light or dark, whatever you have on hand)
2 cups whole RAW cranberries

SIFT flour and soda together
ADD hot water and molasses
ADD RAW cranberries
POUR (batter is REALLY stiff) into one greased LOAF pan
SEAL with tinfoil @@@
BAKE at 350 for 1 hour


SAUCE:
½ cup butter
1 tsp vanilla or other flavoring (rum, or ?)
½ cup evaporated milk
1/3 cup sugar

HEAT all just until butter melts---***DO NOT BOIL!!!

SLICE pudding (warm or cold) into half inch thick slabs and spoon sauce over it.

REALLY YUMMY!!!! 


Two pieces is the normal serving ;)


@@@This is very important. The pudding needs the foil to keep the STEAM in. One of my aunts made it and didn't do this step. She told my mom that it turned out horribly.

***This is another important step. Boiling makes the sauce totally weird. Just heat it until the butter is melted, that's all. 


My hubs will eat a slice, but since there's no chocolate, he'd rather pass. But I'm giving this a FIVE CHERRY Rating anyway, because the rest of is like it enough for him:


Monday, December 9, 2013

Easy Butter Shortbread

The Christmas baking has begun. Bethany needed several large cookies for gifts for the second year radiography class. They've been very helpful to the first years. These are really easy...and so good! I've had this recipe for years. Can't even remember where we got it.


Easy Butter Shortbread


1 cup butter
2/3 cup powdered sugar
2 teaspoons vanilla
2-2 1/4 cup flour
1/8 teaspoon salt

PREHEAT oven to 350 degrees.  In a medium mixing bowl CREAM butter, sugar and vanilla.  ADD two cups flour and salt and MIX until dough is smooth.  If dough feels sticky ADD additional 1/4 cup flour as needed.  Dough should be soft but not sticky.  ROLL into 1" balls and place on ungreased cookie sheet.  BRUSH cookie press lightly with vegetable oil.  PRESS dough with desired cookie presses.  BAKE 10-12 minutes or until golden brown.  COOL 5 minutes on sheet, COOL completely on rack.


Makes 2-3 dozen…and I ALWAYS make a double batch!


After you oil the press, be sure and dip it in sugar to keep it from sticking to the cookie dough. You can use plain white sugar or colored crystals.

When we double the recipe, we use 1 Tbl Vanilla and 1 tsp Almond flavoring

When we made them today, I rolled short logs that were about 1.5 inches thick by about 8 inches long in wax paper. Then Bethany and I rolled the logs in multi-colored sprinkles. We then sliced them into 1/2 inch discs. THEN we squished them with an assortment of cookie presses. They were quite colorful! You can see the sliced discs, along with the presses, here:


Sunday, September 1, 2013

Pecan Sticky Buns

.
 
I recently posted a recipe for One Hour Cinnamon Rolls.

This is the Pecan Sticky Bun Option for that recipe. I cut about eight rolls slightly smaller than the regular buns and place them in the prepared pan. Some of the family likes them with the icing, and some prefer this sticky confection.

The last time I made these, I only did a half recipe as we really didn't need to eat 44 rolls, which is how many the full recipe made.

Here's the half recipe with the Pecan Sticky Option following:

Mix and let sit for 15 minutes:
1 3/4 c. warm water (110° F)
1/4 c. + 2 T. white sugar
1/4 c. canola oil
2 T yeast

Then add:
1 1/2 tsp. salt
2 eggs
6 c all-purpose flour (keep more available in case it's really sticky)    

Cinnamon-Sugar:
1/2 c. white sugar
1 1/2 tsp. ground cinnamon

Mix together by hand for 10 minutes, then let it sit for 10 minutes. Oil counter** and dump out dough. Divide in half. Roll one half out into rectangle. Spread with ¼ c. melted butter and then sprinkle with cinnamon-sugar mixture. Roll up tight, but not too tight. Divide each portion into 12 to 16 rolls and place on greased cookie sheet. Repeat with other half of dough. Let rise. Bake for 12-15 minutes at 400.
 
Spread with icing while warm:
 
Icing
1/2 stick butter (1/4 c.)
dash of salt
1 tsp. vanilla extract
3 c. confectioner's sugar
milk to desired consistency

For the Pecan Sticky Buns:
1/4 c packed brown sugar
1/4 c softened butter
3 T light corn syrup
1/4 c chopped pecans

Grease round cake pan
Blend sugar, butter, and syrup well, and then spread in the prepared pan
Sprinkle with pecans
Place 6-8 cut rolls into the pan. Don't crowd them.
Bake @375 for 12-16 minutes or until deep golden brown
Remove from oven and place a plate over the pan.
CAREFULLY invert the plate covered pan
Wait 2 minutes then remove the pan

**I oil a cookie sheet and place half the dough on it, pressing it out with my fingers. Then I spread the butter and sprinkle the cinnamon sugar on it. I then roll the dough toward me. I use SCISSORS to cut it into rolls. Much easier than a knife.

You can also do this in a muffin pan, but it's much messier than in the cake pan.
I wasn't careful enough at flipping them over last time...and they slipped off the plate! Good thing I had just wiped the stove down just prior to removing them from the oven! What a MESS! I took a spatula and scooped them back onto the plate. Will be much more careful next time.

Tuesday, August 13, 2013

Chicken Enchiladas

We quite often get one of those rotisserie chickens from the commissary. In fact, we sometimes get two. One to eat right away and one to pick the meat off to go into a family favorite, chicken enchiladas.

I've made this recipe so many times, I don't even have to hunt the printed copy down. All of the girls know how to make it, too. If you don't want to use the rotisserie chicken, you can just cook some breasts, boneless thighs, or tenders and shred them. I find that if you are going to cook the chicken yourself, boiling the meat with the bones and just a bit of skin gives the meat a better flavor.


Chicken Enchiladas

Heat oven to 350
Grease a 9x13 baking pan

2 cans cream of chicken soup
8 ounces sour cream (we use the light)
2-3 cups shredded cooked chicken meat
1 small can mild chopped chilies
1 cup shredded cheese, separated
10 soft flour tortillas (we use the plate sized ones)

In a small bowl mix the soup, sour cream and 1/2 cup shredded cheese.
Put about 3/4 of that mixture in a larger bowl and set the smaller bowl aside.
Add the chicken to the mixture in the larger bowl and combine


Place a thick line of the mixture on the tortilla, roll it up, and place it in the greased pan. You can make them fit pretty tightly.

Once all the tortillas are filled and rolled, take the small bowl of filling and cover the tortillas. Make sure you get the filling clear to the edges.

Sprinkle with the rest of the cheese. I didn't specify what kind of cheese to use. Just use whatever kind you like best. When I made this today for my husband's birthday, we used a mix of four different kinds.

If your family likes things more cheesy, use more!

Bake for about 30 minutes. The edges should be a bit bubbly and the cheese should be nice and melty. This doesn't really need to be cooked; it just needs to be heated all the way through.

You can adjust how much filling goes in each tortilla. You can choose to make them a bit leaner...or a bit plumper. Totally up to you.

Sorry, forgot to get a picture when it was done. Will add one the next time we make it!

This one gets a FIVE from the whole family:

Saturday, July 27, 2013

Chocolate Chip Cookie Brittle

Our family loves chocolate chip cookies. It's probably the first recipe that my children ever really helped me with. And who can blame them? They snuck chocolate chips as we mixed and spooned the dough out.

With all the White Texas Sheet Cake, Meringues, and BREAD that I've been making lately, hubs has felt like we've been missing out on one of the main food groups: CHOCOLATE.

So today I'm giving CHOCOLATE CHIP COOKIE BRITTLE a shot. I was surprised at how easy the recipe was. No eggs, either! I was surprised that there wasn't any brown sugar, but then decided that when I make it again I'll substitute BROWN SUGAR for the white. Yep,  haven't met a recipe that I can't tweak!

Now, Nestle has a recipe for this one. You can find it here.  I've omitted the nuts (see? TWEAKING!) because I'm the only one in the family that really likes nuts in anything besides Baklava. You could add nuts if you like. You could also use any flavor of chips you prefer, or you could mix them up! This is easy...and fun.

Chocolate Chip Cookie Brittle

Preheat oven to 350 degrees. Line a 15x9 cookie sheet with parchment paper.

1 cup (2 sticks) butter or margarine, softened
2 teaspoons vanilla extract
1 cup sugar (I'm using BROWN next time!)
1 teaspoon salt
2 cups flour
1 1/4 cups chocolate chips (I think that I'd use mini choc chips next time)
 

Mix the butter and vanilla
Add in the flour, sugar, salt and chocolate chips, using your hands, until combined 
 
The dough is pretty dry and crumbly
 
Place the dough onto lined cookie sheet
 
Using your hands, press it into a thin layer (I read one recipe that said to press it BETWEEN two sheets of parchment paper, and ROLL it thin. I'll be doing THAT next time)
 
The thinner you press it, the more brittle like it will be  
 
Bake for 20 minutes; check it at 15, see if the edges are lightly brown and center is set. You don't want to overcook it, although I'm quite fond of really DARK cookies. The rest of the family prefers them to be less crunchy.
 
 
Cool completely
 
Break into pieces to serve and enjoy!

 
Family Rating:


Friday, July 26, 2013

White Texas Sheet Cake


White Texas Sheet Cake


Before I made a Texas Sheet Cake to take to the therapy riding stable we volunteer at, the family and I went to see PACIFIC RIM. I didn't know a lot about the movie. All I heard was that it was a combination of GODZILLA and TRANSFORMERS. I like action movies and I liked both of those movies, so this seemed like a WIN.

OH MY GOSH WAS IT!
Non-stop action...CUTE Guys...ROBOTS...MONSTERS...EXPLOSIONS...a TOUCH of ROMANCE. Yep, this had it all. I guess it isn't doing so good in the box office and I'm not sure why. It had all those SUMMER FUN aspects. In fact, I think I have to see it again! There was just so much happening, that I think I missed some of it. Yes, it was good fun.

Okay, on to the cake. Last week I saw a recipe on Pinterest that looked pretty good. The blog post was a riot and she really sold me on the cake. Her recipe is slightly different than mine, because, you know I had to tweak it to suit the ingredients I had on hand.

I don't think it hurt this at all. WE LOVE IT. And I'm pretty sure the kids at stable are going to love it too.

You really should read the blog post where I got this. It may tickle your funny bone, too:

Fudgy Vanilla Brownie
Author: 

My Tweaked
WHITE TEXAS SHEET CAKE recipe:


Heat oven to 350

Grease and flour jelly roll pan (9x15)

Cake:

Mix together in a large bowl and set aside:
2 cups flour
2 cups sugar
1 tsp salt
1 tsp baking powder

In a small pot, melt together over medium heat and bring to a boil, stirring often:
1 cup butter
1 cup half and half (original recipe called for heavy whipping cream, which I didn't have)

To the flour add:
1/2 cup Greek yogurt (recipe called for sour cream, which I didn't have)
2 large eggs, beaten
2 tsp almond extract
1 tsp vanilla extract (original recipe called for 1 tsp almond, not nearly enough for our tastes!)

Pour the hot cream/butter into the flour mixture and stir to combine.

Pour into prepared pan.

Bake at 350 for 22-25 minutes until a toothpick comes out clean.

Prepare frosting:

1/2 cup butter, softened
1/4 cup milk
3 cups powdered sugar
2 tsp almond extract
1 tsp vanilla extract (you don't really NEED this much, but we like to TASTE it!)

Spread over warm cake

Enjoy!
 
THIS is a FIVE OUT OF FIVE from the family!
AND the stable family loved it, too:


Updated 8/7/2013

I made another one of these for Amanda's Child of God Day. What's a Child of God Day? Well, since she and my middle daughter share the same birthday, two years apart, we decided that we would celebrate their Baptism Day...not with gifts, but they get to choose the dessert of the day.

Today Amanda chose the White Texas Sheet Cake, but with THREE different glaze flavors. We have the almond, chocolate, and lemon! We just divided up the almond frosting into three bowls and put cocoa in one, and the zest of one lemon and about a tablespoon of the fresh lemon juice.

It turned out YUMMY!
And it's pretty, too!


Tuesday, July 16, 2013

Baklava


Baklava

I discovered the JOY that is Baklava when I was a teen living in Wenatchee, Washington. There was a Greek restaurant that my family visited on a regular basis. A lovely bowl of lentil soup, and baklava for dessert was my standing order.

My mom made a pan of baklava a couple of times for my birthday and I loved it then, too.

Recently my middle daughter and I started going to a local Gyro place...and they have baklava on the menu. I mentioned that Grama had made it before and we both decided to search for a recipe. There are many to be found on the internet. This recipe is a mixture of several. Some suggest a bit of lemon zest in the sugar sauce, but we don't go there.

At this point in time, my eldest and middle daughter have helped me with the preparation of baklava. It IS time consuming, but what a payoff! Look at this gorgeous baklava! Makes you want to lick the screen, doesn't it? You probably shouldn't, but you could make one yourself...let me know how it turns out!


Baklava

1 (16 ounce) package phyllo dough (this is found in the freezer section of your grocery store, right next to the puff pastry)

1 pound chopped nuts (we use almonds, but you can use almost any kind, or a mixture if you are adventurous)

3/4 cup butter (most recipes call for 1 c, but this amount works for us)

1 teaspoon ground cinnamon
 
1 cup water

1 cup white sugar

2 teaspoons vanilla extract (most call for 1 tsp but we like MORE!)

1/2 cup honey

 
Preheat oven to 350 degrees

Butter the bottom and sides of a 9x13 inch pan

Chop nuts and toss with cinnamon in a small bowl. Set aside
 
Unroll phyllo dough. Some recipes say to cut in half, but we don't do that. This fits perfectly in our 9x13 pan
 
Cover phyllo with a dampened cloth to keep from drying out as you work. I don't do this as I have a helper and we can really whip through the preparation. There isn't time for it to dry out!
 
Place two sheets of dough in pan, butter thoroughly. We use our fingers dipped in the butter to mush it around
 
Repeat until you have 8 layered sheets
 
Sprinkle 2 - 3 tablespoons of nut mixture evenly over the top
 
Top with two sheets of dough, butter, nuts, layering as you go
 
When I run out of nuts, I layer the rest of the dough, two at a time until I've used the entire package
The top layer should be at least 6-8 deep. The more the crunchier! 

Using a sharp knife, cut into diamond or square shapes all the way to the bottom of the pan. Dipping the knife in water helps to keep the cuts tidy
 
Bake for about 50 minutes until baklava is a lovely golden brown color.

While the baklava is baking, boil the sugar and water until sugar is melted. Add vanilla and honey. Simmer for about 20 minutes.

Remove baklava from oven and immediately pour the sauce over it. We love to watch and HEAR the sizzle as the warm sauce settles into the hot pastry.
 
Let cool. Serve in cupcake papers. This freezes well. We store it loosely covered in the fridge.

Family Rating of
 
Five out of FIVE!
 

Thursday, July 11, 2013

One Hour Cinnamon Rolls by Valley Ridge Recipes

One Hour Cinnamon Rolls

by Valley Ridge Recipes

I saw these on Pinterest via Valley Ridge Recipes, pinned it, and then tried it. These are fabulous!

Of course, I had to tweak the recipe just a bit because, as my children say, I've never met a recipe that I couldn't change, just a bit! Now that link has some lovely step-by-step pics and you may want to check it out. For example, the original recipe made 24 rolls. They were HUGE. So instead of dividing the dough in half, we quartered it the second time we made them. Ended up with 44 rolls of a very generous size. I also cut the yeast down a tablespoon (because I just couldn't put in SIX TABLESPOONS!) and swapped out some whole wheat flour for the all purpose. Yep, never met a recipe I couldn't tweak just a bit!


One Hour Cinnamon Rolls

Mix and let sit for 15 minutes:
3 1/2 c. warm water
3/4 c. sugar
1/2 c. oil
6 T. yeast (4 1/2 Saf-Instant) (**I was a chicken and only used 5 T of yeast and they turned out fine, HUGE in fact!)

Then add:
1 T. salt
3 eggs
10 1/2 c. flour (**I added about a cup more because I just couldn't handle the STICKINESS. I also used 8+ c of all purpose flour and 2 cups of whole wheat)

Mix together for 10 minutes, then sit for 10 minutes. Oil cupboard, dump out dough. Divide in half. Roll one half out into rectangle. (@@see below) Spread with ¼ c. melted butter and then with cinnamon-sugar mixture. Roll up tight, but not too tight. Divide into 12 rolls and place on greased cookie sheet. Repeat with other half of dough. Let rise. Bake for 12-15 minutes at 400.

Cinnamon-Sugar
1c. sugar
1 T. cinnamon

@@ I actually divided this into four chunks and then rolled them out. I ended up with 44 rolls and they are a very good size. It went much farther the second time I made it. The first time I ended up with 24 HUGE HUGE HUGE rolls. The 44 smaller ones were much easier to handle...and eat!

 Frosting
1 cube butter
2 dashes salt
2 t. vanilla
6 c. powdered sugar
milk

Orange Rolls: Add orange concentrate to regular frosting
Chocolate Rolls: Add baking cocoa and a few drops of water to regular frosting
Cream cheese Rolls: Add cream cheese to regular frosting