Showing posts with label Nuts. Show all posts

Wednesday, November 25, 2015

Aunt Arlyce's Jello Salad

When I was little, and we'd go to Grandpa and Grandma Morrow's Thanksgiving feast, I'd always want a big helping of my Aunt Arlyce's jello salad. Now I make it for Thanksgiving, even though only me and my eldest are the only ones that like it! More leftovers for us!


Aunt Arlyce's Jello Salad
Via Kathie Spitz

1 of each 3 ounce Lime and Lemon jello
1 cup mayo
1 4 ounce can crushed pineapple (save juice)
1 cup cottage cheese
1/2 cup milk
1/2 cup nuts

Dissolve jello in 1 cup HOT water.
Drain pineapple
Use Juice and milk together, ADD water to make 1 1/2 cup.
Add cottage cheese, mayonnaise and pineapple.
MIX thoroughly

ADD nuts and chill until set.

Thursday, January 2, 2014

Easy Chocolate Roll-Up

I received this recipe when I was working as a horse wrangler at a hunting lodge along the White River in Alaska. Doug Vaden's cook, Myra, gave it to me. This is a staple of our Christmas celebrations. This past year I made three.


White River Valley, Alaska
Easy Chocolate Roll-Up
Kathie L. Spitz

PREHEAT OVEN TO 375 degrees

FILLING:
1/4 cup butter
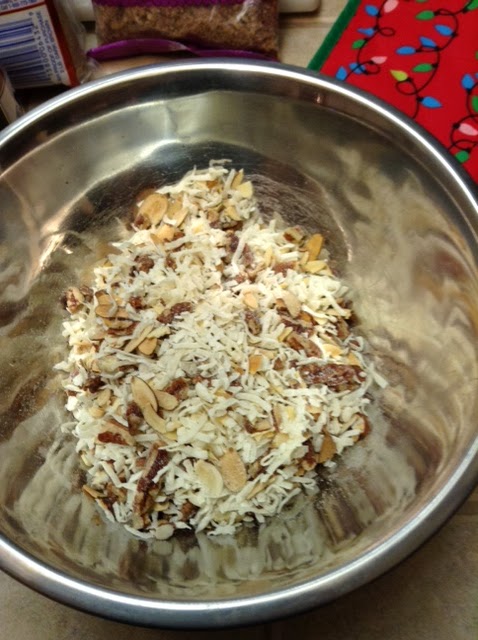
1 1/3 cups flaked coconut
1 cup chopped pecans or walnuts
1 can Eagle Brand CONDENSED Milk (not evaporated)

LINE 15x10 inch cookie sheet (WITH SHORT SIDES) with tin foil
SPRAY with PAM
MELT butter in pan in the oven, watch carefully.
REMOVE from oven and SPRINKLE the melted butter with nuts and coconut
DRIZZLE with entire can of condensed milk, make sure to get to the edges in the corners
SET ASIDE


Cake Batter:
2      eggs
1 cup sugar
1/2 cup cocoa
2/3 cup flour
1/4 tsp salt
1/4 tsp baking soda
1 tsp vanilla
1/3 cup water


BEAT eggs by hand
ADD all the rest and BEAT by hand together
POUR evenly over butter/nut/coconut/milk mixture in pan
BAKE at 375 degrees for 18-22 minutes

DO NOT OVER BAKE

SPRINKLE immediately with powdered sugar
COVER with a SMOOTH tea towel or pillowcase
TURN the pan over CAREFULLY
REMOVE the tin foil IMMEDIATELY
Starting with the 15 inch side ROLL UP TIGHTLY, jelly roll fashion
BE SURE AND MOVE THE TOWEL!!!!! Pictures below
LEAVE wrapped until cool
SLICES easier when totally cool


I like to mix the coconut and nuts together before I sprinkle it on the melted butter.
Besides pecans or walnuts, we've also used sliced almonds and pecans.
Totally YOUR choice of nut...

Make sure to get the filling mixture clear to the edges

Again, make sure the sweetened condensed milk is evenly drizzled over the filling mixture

I also like to mix the flour, sugar, soda, salt and cocoa together in a small bowl before I add it to the beaten eggs

This is one batter we don't like to lick the bowl over as it's a bit bitter from all the cocoa. Pour it evenly over the condensed milk and filling mixture. 


Hmmm...looks red, don't know why...


When it's done (don't over bake!) IMMEDIATELY sift some powdered sugar over the hot cake.

Then place your pillowcase or smooth towel over the sugared cake and 
FLIP it over onto a flat counter.

QUICKLY and CAREFULLY remove the hot pan

...and IMMEDIATELY peel the tinfoil off the hot cake. 
You may have to use a knife to put some of the sticky filling back onto the cake

Then you start rolling the cake along the LONG side. This is the "magic" part. DON'T ROLL THE TOWEL INTO THE CAKE. 
Why yes, I am using my TEETH as a third hand. 

Roll it somewhat tightly, using your hands to keep the roll smooth and compacted. Continue rolling until it's all neat and tidy.

Finish by continuing to roll the towel AROUND the hot roll-up.
Leave it on the counter until it's cool.
Or...leave it for a short while, until you can't stand it anymore, 
and then unroll the towel and cut a slice...or three...off and eat!

It does cut MUCH easier when it's very cool.
Having a glass of hot water to dip your knife in (then wipe the water off) 
makes it easier to slice, too.

My children always used to think it was MAGIC...the way the towel didn't roll into the cake. 

This one is a FIVE STAR RATING from the entire family. 
We hope you enjoy it too!


Sunday, September 1, 2013

Pecan Sticky Buns

.
 
I recently posted a recipe for One Hour Cinnamon Rolls.

This is the Pecan Sticky Bun Option for that recipe. I cut about eight rolls slightly smaller than the regular buns and place them in the prepared pan. Some of the family likes them with the icing, and some prefer this sticky confection.

The last time I made these, I only did a half recipe as we really didn't need to eat 44 rolls, which is how many the full recipe made.

Here's the half recipe with the Pecan Sticky Option following:

Mix and let sit for 15 minutes:
1 3/4 c. warm water (110° F)
1/4 c. + 2 T. white sugar
1/4 c. canola oil
2 T yeast

Then add:
1 1/2 tsp. salt
2 eggs
6 c all-purpose flour (keep more available in case it's really sticky)    

Cinnamon-Sugar:
1/2 c. white sugar
1 1/2 tsp. ground cinnamon

Mix together by hand for 10 minutes, then let it sit for 10 minutes. Oil counter** and dump out dough. Divide in half. Roll one half out into rectangle. Spread with ¼ c. melted butter and then sprinkle with cinnamon-sugar mixture. Roll up tight, but not too tight. Divide each portion into 12 to 16 rolls and place on greased cookie sheet. Repeat with other half of dough. Let rise. Bake for 12-15 minutes at 400.
 
Spread with icing while warm:
 
Icing
1/2 stick butter (1/4 c.)
dash of salt
1 tsp. vanilla extract
3 c. confectioner's sugar
milk to desired consistency

For the Pecan Sticky Buns:
1/4 c packed brown sugar
1/4 c softened butter
3 T light corn syrup
1/4 c chopped pecans

Grease round cake pan
Blend sugar, butter, and syrup well, and then spread in the prepared pan
Sprinkle with pecans
Place 6-8 cut rolls into the pan. Don't crowd them.
Bake @375 for 12-16 minutes or until deep golden brown
Remove from oven and place a plate over the pan.
CAREFULLY invert the plate covered pan
Wait 2 minutes then remove the pan

**I oil a cookie sheet and place half the dough on it, pressing it out with my fingers. Then I spread the butter and sprinkle the cinnamon sugar on it. I then roll the dough toward me. I use SCISSORS to cut it into rolls. Much easier than a knife.

You can also do this in a muffin pan, but it's much messier than in the cake pan.
I wasn't careful enough at flipping them over last time...and they slipped off the plate! Good thing I had just wiped the stove down just prior to removing them from the oven! What a MESS! I took a spatula and scooped them back onto the plate. Will be much more careful next time.

Wednesday, August 21, 2013

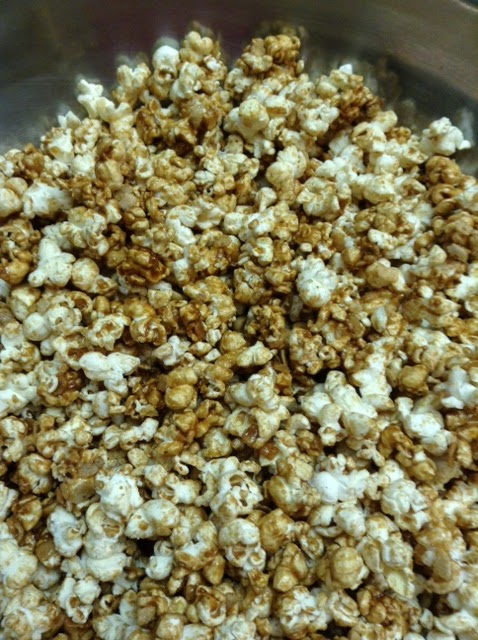
Microwave Caramel Corn

Fifteen years ago a lovely friend, Debbie Burgett, gave me a recipe for Microwave Caramel Corn. This stuff is heavenly! It was medicinal during some edits that I've done. Got me through them. I'd edit a couple pages, grab a handful of this, pace around the house...then get back to editing. Yep, medicinal!

This is the closest thing to Cracker Jacks that I've ever seen. I think it's the baking soda that makes the kernels separate.


Debbie Burgett's Microwave Caramel Corn

2 bags microwave popcorn (we use the air popper and guesstimate amounts)
1 1/2 cups of peanuts (optional)
1 cup packed brown sugar
1/2 cup butter
1/4 cup corn syrup
1/2 tsp salt (we don't add this)
1/2 tsp baking soda
 
Pop corn and place half in a large brown paper bag
 
Combine butter, sugar, syrup and salt in a large microwaveable bowl
Microwave on high for 3-4 minutes, stirring after each minute
 
Once it comes to a boil, microwave for two more minutes
 
Remove from microwave and stir in baking soda
 
Pour half of the mixture over the popcorn in the bag
 
Put the rest of the popcorn in the bag and cover with the remaining mixture
 
Close bag and SHAKE WELL
 
Microwave for 45 seconds and SHAKE again
 
Microwave for 45 seconds and SHAKE again
 
Microwave for 45 seconds and SHAKE again
 
Pour into a roasting pan
 
Cool and stir to separate kernels
 
YUMMY!
 
WARNING: The butter, sugar, and syrup mixture is VERY HOT. BE CAREFUL when pouring it over the popped corn. I try to make sure that I don't get any on the SIDES of the bag. It's never happened, but I worry about the bag catching fire. Nope, hasn't happened, but I worry anyway.
 
Options:
 
Add cereal to the popcorn. Quaker Oat Squares are a yummy alternative.
MIXED nuts makes a fun crunch.
 
HALF this recipe is more than enough for two hungry people.


Tuesday, July 16, 2013

Baklava


Baklava

I discovered the JOY that is Baklava when I was a teen living in Wenatchee, Washington. There was a Greek restaurant that my family visited on a regular basis. A lovely bowl of lentil soup, and baklava for dessert was my standing order.

My mom made a pan of baklava a couple of times for my birthday and I loved it then, too.

Recently my middle daughter and I started going to a local Gyro place...and they have baklava on the menu. I mentioned that Grama had made it before and we both decided to search for a recipe. There are many to be found on the internet. This recipe is a mixture of several. Some suggest a bit of lemon zest in the sugar sauce, but we don't go there.

At this point in time, my eldest and middle daughter have helped me with the preparation of baklava. It IS time consuming, but what a payoff! Look at this gorgeous baklava! Makes you want to lick the screen, doesn't it? You probably shouldn't, but you could make one yourself...let me know how it turns out!


Baklava

1 (16 ounce) package phyllo dough (this is found in the freezer section of your grocery store, right next to the puff pastry)

1 pound chopped nuts (we use almonds, but you can use almost any kind, or a mixture if you are adventurous)

3/4 cup butter (most recipes call for 1 c, but this amount works for us)

1 teaspoon ground cinnamon
 
1 cup water

1 cup white sugar

2 teaspoons vanilla extract (most call for 1 tsp but we like MORE!)

1/2 cup honey

 
Preheat oven to 350 degrees

Butter the bottom and sides of a 9x13 inch pan

Chop nuts and toss with cinnamon in a small bowl. Set aside
 
Unroll phyllo dough. Some recipes say to cut in half, but we don't do that. This fits perfectly in our 9x13 pan
 
Cover phyllo with a dampened cloth to keep from drying out as you work. I don't do this as I have a helper and we can really whip through the preparation. There isn't time for it to dry out!
 
Place two sheets of dough in pan, butter thoroughly. We use our fingers dipped in the butter to mush it around
 
Repeat until you have 8 layered sheets
 
Sprinkle 2 - 3 tablespoons of nut mixture evenly over the top
 
Top with two sheets of dough, butter, nuts, layering as you go
 
When I run out of nuts, I layer the rest of the dough, two at a time until I've used the entire package
The top layer should be at least 6-8 deep. The more the crunchier! 

Using a sharp knife, cut into diamond or square shapes all the way to the bottom of the pan. Dipping the knife in water helps to keep the cuts tidy
 
Bake for about 50 minutes until baklava is a lovely golden brown color.

While the baklava is baking, boil the sugar and water until sugar is melted. Add vanilla and honey. Simmer for about 20 minutes.

Remove baklava from oven and immediately pour the sauce over it. We love to watch and HEAR the sizzle as the warm sauce settles into the hot pastry.
 
Let cool. Serve in cupcake papers. This freezes well. We store it loosely covered in the fridge.

Family Rating of
 
Five out of FIVE!
 

Sunday, July 14, 2013

Italian Cream Cake by Mary Beth Jeanes

Tomorrow is my youngest child's birthday. I always make this cake for MY birthday, and it was a very pleasant surprise when she stated that she wanted this cake for hers!  This one is pretty labor intensive, but it is so worth it. Now, you'll notice that the picture looks a bit...weird. That's because purple is my child's favorite color, so we tinted the cake itself lavender. It's usually a lovely yellow cake color. But even with the odd color, this tastes FABULOUS! If (when!) you taste the batter, this is what CAKE BATTER is supposed to taste like. I don't mind using mixes, but if you want a REAL YELLOW CAKE, this is the recipe for you!

I got the recipe from the cookbook that the Officers' Wives Club at Tyndall Air Force Base in Panama City, Florida offered many years ago. It's just a bonus that the recipe was submitted by a good friend of mine.

Now, you'll also notice that there are NO NUTS in this cake pic...that's because the PURPLE LOVING GIRL also hates pecans...so, I'm sure your rendition of this cake will be prettier and fully loaded with pecans!


Italian Cream Cake


Mary Beth Jeanes

5 eggs, separated
2 sticks oleo (I used butter)
2 cups sugar
2 cups flour
1 cup buttermilk
1 tsp baking soda
1 cup coconut
1 tsp vanilla

Preheat oven to 350 degrees.

Stiffen egg whites in a small bowl and set aside. 

In another bowl, cream oleo and sugar. 

Add egg yolks, one at a time. 

Mix flour and soda together then add to oleo mixture, alternating with buttermilk. 

Add coconut and vanilla. 

Fold in egg whites. 

Pour into 3 greased and floured cake pans. 

Bake 25 minutes.  Cool in pan for 10 minutes then invert, remove the pan, and finish cooling on wire racks.

The cake will be tall when removed from oven, but will then fall, it's supposed to do that so that the layers are DENSE.

Frost with cream cheese icing.

Cream Cheese Icing

1 8 ounce pkg. Cream cheese
1 cup chopped pecans
1 stick oleo (I used butter)
16 ounces powdered sugar
1 tsp vanilla
Soften cream cheese and oleo.

Mix well then add powdered  sugar

Spread on bottom layer and sprinkle with 1/4 cup pecans

Repeat with second layer.

Add remaining layer and ice entire cake.

Sprinkle remaining pecans over entire cake. 


This cake is so rich, that a very thin wedge is enough, but then you can  eat TWO! Of course, when you see the color of THIS particular cake, you might think twice! Kind of a weird lavender gray thing...I'll update the pics when I make the NEXT one!

It really IS a lovely YELLOW CAKE!


Although my youngest told my oldest that since this was rather an UNDEAD color, that maybe the eldest would like the same color cake, with GREEN icing...that way it would really ROCK the ZOMBIE CAKE LOOK. Ah, I love my kids!
This gets a Family Rating of
Five out of Five!
even with the odd color!


Editing to add a NEW picture. This time, the natural color of this lovely cake batter...with blue frosting. Because it was my 55th birthday cake and I like blue. I also love Swedish Fish...red...and there you have my 55 on the top in FISH. Also, this one has almonds instead of pecans, as the majority of the family like those better than the other. It was yummy: