Monday, July 29, 2013

Eggs


We have a small flock of chickens. I sell a couple dozen eggs a week. And we eat eggs all the time. We use them in baking, potato salad, fried for sandwiches, and hard boiled. We feed the goldfish in the koi pond a yolk every month. The dogs get them, too.

One thing about a fresh egg, as opposed to the ones you get from the store which may be up to three months old, it is almost impossible to peel a hard-boiled FRESH egg. At least that's what I always thought. I mentioned this to one of my elderly egg buyers. She scoffed and said, "Of course you can peel a fresh egg! You just have to crack it first. My Grammy taught me that trick."

Crack it? I was sure she was nuts, but being a home school family, we followed her directions, and sure enough...you CAN peel a fresh, hard-boiled egg!

The secret is cracking the egg on the large end. You just tap it on the counter until you hear the CRACK. Don't do it hard enough to smash it, just enough to crack it. The large end is where the little air pocket is.

I asked Annie if the white would ooze out. I hate it when it does that...shudder. She assured me that it wouldn't.

The home school students immediately cracked several eggs...lightly...and placed them in the pot of cold water. We watched over the pot as it came to a boil, waiting to see if the white would ooze. Nope, not a bit of it came out.

We boiled the eggs for 11 minutes, then rinsed them in cold water. We each took an egg and cracked it all over.

THEY PEELED LIKE MONTH OLD EGGS!

We were VERY impressed. I was so impressed that I gave Annie three dozen eggs for FREE the next time she came by.

Caveat: We have one hen whose egg just won't peel nicely, though. Not sure who she is, but one brown egg still doesn't peel well. But all the rest, little white bantam eggs, green Americana Arucaunas, and the other brown eggs all peel very neatly and easily.

I used an egg wedger for years. I got it in Germany and the girls and I enjoyed making egg wedges with it. It finally broke a couple of months ago. Hubs, being the great guy that he is, found a slicer/wedger and ordered it for me. I love it!


Here's a link if you want one for yourself - Egg Slicer Wedger Piercer.


The Egg Skelter

This is another nifty thing that Hubs got me for Christmas this year. It keeps our eggs in order of lay. You just take the one off the end (in this case, that big green one) and the rest roll down. I love it! It holds two dozen eggs. The only drawback is that the bantam eggs don't work on there. They are smaller than the others and will "clog" the roll...so they go in a bowl beside this wonderful gadget.

Sunday, July 28, 2013

Crock Pot Orange Pineapple Chicken

We all love Orange Chicken, be it from Panda Express or from the deli counter at Walmart. When I saw several recipes for it on Pinterest recently, I knew that we had to try it. Those glazed chicken pictures just called to me. They all look like Panda Express Orange Chicken. While reading the recipes, I realized that without battering and deep frying, the recipes won't turn out like the pictures, not if made in a crock pot! I was intrigued by the idea of using concentrated orange juice as the base of the sauce, as directed by many of those recipes.

Now, this is BIG...This recipe doesn't make that kind of Panda Express Orange Chicken. This is WET chicken, not deep fried or battered, and it doesn't end up glazed. So, while it isn't Panda Express Orange Chicken, it IS good and tasty.


CROCK POT ORANGE PINEAPPLE CHICKEN

Ingredients:
 
4 thighs with skin and bones (You could use all thighs, all tenderloins, or breasts)
8-10 chicken tenderloins
3/4 cup baby carrots
3 stalks celery, sliced thin
2 large red, orange or green bell peppers (I didn't have any when I first made it, dang it!)
3 cloves garlic, minced
1 can Mandarin oranges, with the juice
1 cup pineapple chunks
1 tsp ground ginger
1/2 tsp pepper or to taste
8 ounces orange juice concentrate, thawed
**You could even add a splash of soy sauce for a more Oriental taste, maybe even a dash of Sesame Oil
 
Place the chicken chunks in the bottom of the crock pot and then put the fruit and veggies on top
Mix the orange juice concentrate with the spices and pour over the fruit and chicken
Cook on low for 6-8 hours or on high for 3-4
 
We served it with Jasmine rice.
 
This gets a FOUR out of FIVE on the Family Rating
as one child was not fond of it:
 

Saturday, July 27, 2013

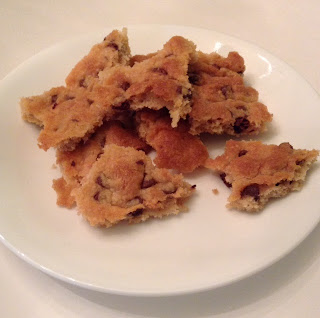
Chocolate Chip Cookie Brittle

Our family loves chocolate chip cookies. It's probably the first recipe that my children ever really helped me with. And who can blame them? They snuck chocolate chips as we mixed and spooned the dough out.

With all the White Texas Sheet Cake, Meringues, and BREAD that I've been making lately, hubs has felt like we've been missing out on one of the main food groups: CHOCOLATE.

So today I'm giving CHOCOLATE CHIP COOKIE BRITTLE a shot. I was surprised at how easy the recipe was. No eggs, either! I was surprised that there wasn't any brown sugar, but then decided that when I make it again I'll substitute BROWN SUGAR for the white. Yep,  haven't met a recipe that I can't tweak!

Now, Nestle has a recipe for this one. You can find it here.  I've omitted the nuts (see? TWEAKING!) because I'm the only one in the family that really likes nuts in anything besides Baklava. You could add nuts if you like. You could also use any flavor of chips you prefer, or you could mix them up! This is easy...and fun.

Chocolate Chip Cookie Brittle

Preheat oven to 350 degrees. Line a 15x9 cookie sheet with parchment paper.

1 cup (2 sticks) butter or margarine, softened
2 teaspoons vanilla extract
1 cup sugar (I'm using BROWN next time!)
1 teaspoon salt
2 cups flour
1 1/4 cups chocolate chips (I think that I'd use mini choc chips next time)
 

Mix the butter and vanilla
Add in the flour, sugar, salt and chocolate chips, using your hands, until combined 
 
The dough is pretty dry and crumbly
 
Place the dough onto lined cookie sheet
 
Using your hands, press it into a thin layer (I read one recipe that said to press it BETWEEN two sheets of parchment paper, and ROLL it thin. I'll be doing THAT next time)
 
The thinner you press it, the more brittle like it will be  
 
Bake for 20 minutes; check it at 15, see if the edges are lightly brown and center is set. You don't want to overcook it, although I'm quite fond of really DARK cookies. The rest of the family prefers them to be less crunchy.
 
 
Cool completely
 
Break into pieces to serve and enjoy!

 
Family Rating:


Friday, July 26, 2013

White Texas Sheet Cake


White Texas Sheet Cake


Before I made a Texas Sheet Cake to take to the therapy riding stable we volunteer at, the family and I went to see PACIFIC RIM. I didn't know a lot about the movie. All I heard was that it was a combination of GODZILLA and TRANSFORMERS. I like action movies and I liked both of those movies, so this seemed like a WIN.

OH MY GOSH WAS IT!
Non-stop action...CUTE Guys...ROBOTS...MONSTERS...EXPLOSIONS...a TOUCH of ROMANCE. Yep, this had it all. I guess it isn't doing so good in the box office and I'm not sure why. It had all those SUMMER FUN aspects. In fact, I think I have to see it again! There was just so much happening, that I think I missed some of it. Yes, it was good fun.

Okay, on to the cake. Last week I saw a recipe on Pinterest that looked pretty good. The blog post was a riot and she really sold me on the cake. Her recipe is slightly different than mine, because, you know I had to tweak it to suit the ingredients I had on hand.

I don't think it hurt this at all. WE LOVE IT. And I'm pretty sure the kids at stable are going to love it too.

You really should read the blog post where I got this. It may tickle your funny bone, too:

Fudgy Vanilla Brownie
Author: 

My Tweaked
WHITE TEXAS SHEET CAKE recipe:


Heat oven to 350

Grease and flour jelly roll pan (9x15)

Cake:

Mix together in a large bowl and set aside:
2 cups flour
2 cups sugar
1 tsp salt
1 tsp baking powder

In a small pot, melt together over medium heat and bring to a boil, stirring often:
1 cup butter
1 cup half and half (original recipe called for heavy whipping cream, which I didn't have)

To the flour add:
1/2 cup Greek yogurt (recipe called for sour cream, which I didn't have)
2 large eggs, beaten
2 tsp almond extract
1 tsp vanilla extract (original recipe called for 1 tsp almond, not nearly enough for our tastes!)

Pour the hot cream/butter into the flour mixture and stir to combine.

Pour into prepared pan.

Bake at 350 for 22-25 minutes until a toothpick comes out clean.

Prepare frosting:

1/2 cup butter, softened
1/4 cup milk
3 cups powdered sugar
2 tsp almond extract
1 tsp vanilla extract (you don't really NEED this much, but we like to TASTE it!)

Spread over warm cake

Enjoy!
 
THIS is a FIVE OUT OF FIVE from the family!
AND the stable family loved it, too:


Updated 8/7/2013

I made another one of these for Amanda's Child of God Day. What's a Child of God Day? Well, since she and my middle daughter share the same birthday, two years apart, we decided that we would celebrate their Baptism Day...not with gifts, but they get to choose the dessert of the day.

Today Amanda chose the White Texas Sheet Cake, but with THREE different glaze flavors. We have the almond, chocolate, and lemon! We just divided up the almond frosting into three bowls and put cocoa in one, and the zest of one lemon and about a tablespoon of the fresh lemon juice.

It turned out YUMMY!
And it's pretty, too!


Wednesday, July 24, 2013

Fresh Apple Cake by It's a Lifestyle, Not a Fad

.
Fresh Apple ~ Blueberry Cake

Today on Facebook I saw this super easy cake recipe. The family are almost home from a three-day vacation and this looks like the right thing to welcome them home with.

The cake was shared by a Facebook Group called It's a Lifestyle, Not a Fad and you can click on the name and ask to be admitted to the closed group.

When I first saw it, I thought that it would be great with blueberries, but Delaney isn't fond of that fruit so I decided to do half apples and half berries. A friend, Krissy, says she wants the bit from where the fruits meet!

This is three apples and about three cups of frozen blueberries:


Here it is sprinkled with the dry cake mix and one stick of melted butter. I almost used the Smart Start...but decided against it, although that would have worked, too.


My pan holds the same amount as a 9x13 pan, but this particular baking dish is a Polish Pottery one of slightly odd dimensions.


Here is the recipe as posted on Facebook:

Fresh Apple Cake

Layer your apple slices (or other fruit) at the bottom of a pan (9x11) that has been coated with non-stick spray.
Sprinkle on boxed cake mix.
Pour 1/2 cup of melted butter over the fruit and dry cake mix.
Bake at 350 for approximately 35-45 minutes -- it's done when it is nice and bubbly.


Since I used frozen blueberries, it took a little longer. I just kept watching to make sure that it was bubbly in the middle.

Now that I've done it once, I think my tweak would be to only use HALF of the dry cake mix. Or maybe add a cup of apple juice to the fruit. My fruit didn't make it quite moist enough.

I'm going to give this a FAMILY RATING of
 
THREE OUT OF FIVE


As three of us liked it and two just thought: meh.
When I pointed out the apples for Delaney, she said:
You know I don't like cooked apples EITHER.
 
 
Cooking is always an adventure for this family.

It was easy peasy! Let me know how YOURS turns out!

Tuesday, July 16, 2013

Baklava


Baklava

I discovered the JOY that is Baklava when I was a teen living in Wenatchee, Washington. There was a Greek restaurant that my family visited on a regular basis. A lovely bowl of lentil soup, and baklava for dessert was my standing order.

My mom made a pan of baklava a couple of times for my birthday and I loved it then, too.

Recently my middle daughter and I started going to a local Gyro place...and they have baklava on the menu. I mentioned that Grama had made it before and we both decided to search for a recipe. There are many to be found on the internet. This recipe is a mixture of several. Some suggest a bit of lemon zest in the sugar sauce, but we don't go there.

At this point in time, my eldest and middle daughter have helped me with the preparation of baklava. It IS time consuming, but what a payoff! Look at this gorgeous baklava! Makes you want to lick the screen, doesn't it? You probably shouldn't, but you could make one yourself...let me know how it turns out!


Baklava

1 (16 ounce) package phyllo dough (this is found in the freezer section of your grocery store, right next to the puff pastry)

1 pound chopped nuts (we use almonds, but you can use almost any kind, or a mixture if you are adventurous)

3/4 cup butter (most recipes call for 1 c, but this amount works for us)

1 teaspoon ground cinnamon
 
1 cup water

1 cup white sugar

2 teaspoons vanilla extract (most call for 1 tsp but we like MORE!)

1/2 cup honey

 
Preheat oven to 350 degrees

Butter the bottom and sides of a 9x13 inch pan

Chop nuts and toss with cinnamon in a small bowl. Set aside
 
Unroll phyllo dough. Some recipes say to cut in half, but we don't do that. This fits perfectly in our 9x13 pan
 
Cover phyllo with a dampened cloth to keep from drying out as you work. I don't do this as I have a helper and we can really whip through the preparation. There isn't time for it to dry out!
 
Place two sheets of dough in pan, butter thoroughly. We use our fingers dipped in the butter to mush it around
 
Repeat until you have 8 layered sheets
 
Sprinkle 2 - 3 tablespoons of nut mixture evenly over the top
 
Top with two sheets of dough, butter, nuts, layering as you go
 
When I run out of nuts, I layer the rest of the dough, two at a time until I've used the entire package
The top layer should be at least 6-8 deep. The more the crunchier! 

Using a sharp knife, cut into diamond or square shapes all the way to the bottom of the pan. Dipping the knife in water helps to keep the cuts tidy
 
Bake for about 50 minutes until baklava is a lovely golden brown color.

While the baklava is baking, boil the sugar and water until sugar is melted. Add vanilla and honey. Simmer for about 20 minutes.

Remove baklava from oven and immediately pour the sauce over it. We love to watch and HEAR the sizzle as the warm sauce settles into the hot pastry.
 
Let cool. Serve in cupcake papers. This freezes well. We store it loosely covered in the fridge.

Family Rating of
 
Five out of FIVE!
 

Sunday, July 14, 2013

Italian Cream Cake by Mary Beth Jeanes

Tomorrow is my youngest child's birthday. I always make this cake for MY birthday, and it was a very pleasant surprise when she stated that she wanted this cake for hers!  This one is pretty labor intensive, but it is so worth it. Now, you'll notice that the picture looks a bit...weird. That's because purple is my child's favorite color, so we tinted the cake itself lavender. It's usually a lovely yellow cake color. But even with the odd color, this tastes FABULOUS! If (when!) you taste the batter, this is what CAKE BATTER is supposed to taste like. I don't mind using mixes, but if you want a REAL YELLOW CAKE, this is the recipe for you!

I got the recipe from the cookbook that the Officers' Wives Club at Tyndall Air Force Base in Panama City, Florida offered many years ago. It's just a bonus that the recipe was submitted by a good friend of mine.

Now, you'll also notice that there are NO NUTS in this cake pic...that's because the PURPLE LOVING GIRL also hates pecans...so, I'm sure your rendition of this cake will be prettier and fully loaded with pecans!


Italian Cream Cake


Mary Beth Jeanes

5 eggs, separated
2 sticks oleo (I used butter)
2 cups sugar
2 cups flour
1 cup buttermilk
1 tsp baking soda
1 cup coconut
1 tsp vanilla

Preheat oven to 350 degrees.

Stiffen egg whites in a small bowl and set aside. 

In another bowl, cream oleo and sugar. 

Add egg yolks, one at a time. 

Mix flour and soda together then add to oleo mixture, alternating with buttermilk. 

Add coconut and vanilla. 

Fold in egg whites. 

Pour into 3 greased and floured cake pans. 

Bake 25 minutes.  Cool in pan for 10 minutes then invert, remove the pan, and finish cooling on wire racks.

The cake will be tall when removed from oven, but will then fall, it's supposed to do that so that the layers are DENSE.

Frost with cream cheese icing.

Cream Cheese Icing

1 8 ounce pkg. Cream cheese
1 cup chopped pecans
1 stick oleo (I used butter)
16 ounces powdered sugar
1 tsp vanilla
Soften cream cheese and oleo.

Mix well then add powdered  sugar

Spread on bottom layer and sprinkle with 1/4 cup pecans

Repeat with second layer.

Add remaining layer and ice entire cake.

Sprinkle remaining pecans over entire cake. 


This cake is so rich, that a very thin wedge is enough, but then you can  eat TWO! Of course, when you see the color of THIS particular cake, you might think twice! Kind of a weird lavender gray thing...I'll update the pics when I make the NEXT one!

It really IS a lovely YELLOW CAKE!


Although my youngest told my oldest that since this was rather an UNDEAD color, that maybe the eldest would like the same color cake, with GREEN icing...that way it would really ROCK the ZOMBIE CAKE LOOK. Ah, I love my kids!
This gets a Family Rating of
Five out of Five!
even with the odd color!


Editing to add a NEW picture. This time, the natural color of this lovely cake batter...with blue frosting. Because it was my 55th birthday cake and I like blue. I also love Swedish Fish...red...and there you have my 55 on the top in FISH. Also, this one has almonds instead of pecans, as the majority of the family like those better than the other. It was yummy:


Meringues

When I discovered Pinterest (Thanks, Sandi!), I kept seeing all of these lovely meringues. I have chickens, and an abundance of eggs, so thought I'd give a recipe a try. The first batch wasn't perfect, neither was the second...but I persevered! They all tasted good, but I wanted them prettier and better. My family laughed at me as I proceeded to make these tasty little puffs about every other day for a week.

After searching through about a dozen recipes, I think this is the best tweak that I can come up with. Martha Stewart's magazine had orange and lemon ones on the cover recently. She's probably to blame for the millions of meringues that have been consumed in the last couple months!

While they look hard, it's actually pretty easy. Although if it is humid on the day you make them, and you let them sit out, they will sweat...and won't be quite as crunchy. Not that it would stop me from eating one or three...lol


Meringues

4 large egg whites, room temperature
1 cup sugar (I pulse this in the food processor to make it superfine)
¼ tsp salt
¼ tsp cream of tartar
1 tsp vanilla
 
 
 Heat oven to 175
On low, beat egg whites until frothy
Add salt and cream of tartar
Beat on medium until it stiffens
Beat on high, adding sugar one tablespoon at a time. Fully beat the sugar in each time
Once the mixture is glossy and stiff, beat the vanilla (or other flavoring) in quickly
Place mixture in piping bag and pipe onto parchment covered cookie sheets
 
This recipe fills two large cookie sheets
Place both sheets in the oven
Bake for an hour then turn oven off, crack the door and leave until fully cooled
We have a convection oven, so I don’t crack the door. The fan tends to blow for quite a while after I turn the oven off. I just leave them in there until they are cool. Store in an air tight container. We just leave the pans in the oven and eat them until they are gone...about four at a time! Which is why I make them SMALL.

Options:
You can add additional flavorings: mint, 1 tablespoon grated lemon or orange zest, rum, only limited to your imagination. You can also put color gel in the bag to make it even prettier.
We also add about a cup of mini chocolate chips to half the recipe. Some in the family like it, some don’t. If you are piping through a tip, you'll need the LARGE size tip to allow the chips to flow through.
 
If you don't have piping tips, couplers and bags, you can always just put the mixture into a zip-lock bag, cut a corner off (SMALL!) and pipe it out that way. That's what I did the first couple times. But then had to buy a big star tip, to make them prettier!

Thursday, July 11, 2013

One Hour Cinnamon Rolls by Valley Ridge Recipes

One Hour Cinnamon Rolls

by Valley Ridge Recipes

I saw these on Pinterest via Valley Ridge Recipes, pinned it, and then tried it. These are fabulous!

Of course, I had to tweak the recipe just a bit because, as my children say, I've never met a recipe that I couldn't change, just a bit! Now that link has some lovely step-by-step pics and you may want to check it out. For example, the original recipe made 24 rolls. They were HUGE. So instead of dividing the dough in half, we quartered it the second time we made them. Ended up with 44 rolls of a very generous size. I also cut the yeast down a tablespoon (because I just couldn't put in SIX TABLESPOONS!) and swapped out some whole wheat flour for the all purpose. Yep, never met a recipe I couldn't tweak just a bit!


One Hour Cinnamon Rolls

Mix and let sit for 15 minutes:
3 1/2 c. warm water
3/4 c. sugar
1/2 c. oil
6 T. yeast (4 1/2 Saf-Instant) (**I was a chicken and only used 5 T of yeast and they turned out fine, HUGE in fact!)

Then add:
1 T. salt
3 eggs
10 1/2 c. flour (**I added about a cup more because I just couldn't handle the STICKINESS. I also used 8+ c of all purpose flour and 2 cups of whole wheat)

Mix together for 10 minutes, then sit for 10 minutes. Oil cupboard, dump out dough. Divide in half. Roll one half out into rectangle. (@@see below) Spread with ¼ c. melted butter and then with cinnamon-sugar mixture. Roll up tight, but not too tight. Divide into 12 rolls and place on greased cookie sheet. Repeat with other half of dough. Let rise. Bake for 12-15 minutes at 400.

Cinnamon-Sugar
1c. sugar
1 T. cinnamon

@@ I actually divided this into four chunks and then rolled them out. I ended up with 44 rolls and they are a very good size. It went much farther the second time I made it. The first time I ended up with 24 HUGE HUGE HUGE rolls. The 44 smaller ones were much easier to handle...and eat!

 Frosting
1 cube butter
2 dashes salt
2 t. vanilla
6 c. powdered sugar
milk

Orange Rolls: Add orange concentrate to regular frosting
Chocolate Rolls: Add baking cocoa and a few drops of water to regular frosting
Cream cheese Rolls: Add cream cheese to regular frosting


Wednesday, July 10, 2013

Welcome to my Cookbook

The things that I cook regularly has expanded from one two inch binder into five one inch binders.

And finding things is sometimes difficult.

I've decided to share my recipes here. Kind of weird, right? This is a BOOK REVIEW SITE...but cookbooks are books, too. Figured I'd put pictures with the recipes as I make them.

Why not, right?


Kicking this off with Blueberry French Toast. It's in the oven right now and the blueberry sauce is simmering on the stove.

Want to join us for lunch? Come on over!

Blueberry French Toast by Patricia Walsh


BLUEBERRY FRENCH TOAST


Patricia Walls
printed in Taste of Home...many many years ago


12 slices day-old bread
2 packages (8 ounces each) Cream Cheese
1 cup fresh or frozen blueberries
12 eggs
2 cups milk
1/3 cup maple syrup or honey
 

Sauce:
1 cup sugar
2 tablespoons cornstarch
1 cup water
1 cup fresh or frozen blueberries
1 tablespoon butter or margarine


CUT bread into 1 inch cubes (I just tear mine into little pieces)
PLACE half in a greased 13x9x2 inch baking dish
CUT cream cheese into 1 inch cubes (I just sort of pinch off small pieces)
PLACE over bread
TOP with blueberries and remaining bread and SET aside
 

In large bowl BEAT eggs
ADD milk and syrup
MIX well
POUR over bread mixture
COVER and chill 8 hours or overnight
 
REMOVE from refrigerator 30 minutes before baking
COVER and BAKE at 350 for 30 minutes
UNCOVER and BAKE 25-30 minutes more or until golden brown and the center is set

 
In saucepan:
COMBINE sugar and cornstarch
ADD water
BRING to boil over medium heat, BOIL for 3 minutes stirring constantly
STIR in blueberries and REDUCE heat
SIMMER for 8-10 minutes or until blueberries burst
STIR in butter until melted
 

SERVE over French toast

YEILD: 6-8 servings (1 ¾ cups sauce*)


*I like to double the sauce recipe and serve it over ice cream!