Friday, December 27, 2013

Steamed Cranberry Pudding

Steamed Cranberry Pudding sounds "not so good," doesn't it? Steamed pudding? With cranberries? And just LOOK at it, it looks like, gasp, FRUITCAKE:

Many years ago, a lovely friend of ours, Mary Ellen St. John, of Wenatchee, Washington, made this dessert. My mom pushed her slice around on her plate for several minutes, trying to get the courage to taste it. She had said something like, "Icky, this looks icky."

After taking a deep breath, Mom took a bite. And then another. Once finished, she asked Mary Ellen for another slice. And she said, "No, make your own." At least she did give us the recipe and it's now a staple in our holiday baking. We had it for our Christmas Dinner Dessert this year for the umpteenth time.

That "icky" response is generally the one we get when we make this and people see it for the first time. It does look like fruitcake, which is not the favorite of a majority of people, if my unscientific poll is even close to the truth.

But one taste of this usually means that people are asking for more. They also tend to lick their plate when they think no one is looking.

The recipe is incredibly easy. And I hope you let me know if you liked it.


Cranberry Pudding

Ann Morrow from Mary Ellen St. John


PUDDING:
1 1/3  Flour
2 tsp baking soda
1/3 cup hot water
½ cup molasses (light or dark, whatever you have on hand)
2 cups whole RAW cranberries

SIFT flour and soda together
ADD hot water and molasses
ADD RAW cranberries
POUR (batter is REALLY stiff) into one greased LOAF pan
SEAL with tinfoil @@@
BAKE at 350 for 1 hour


SAUCE:
½ cup butter
1 tsp vanilla or other flavoring (rum, or ?)
½ cup evaporated milk
1/3 cup sugar

HEAT all just until butter melts---***DO NOT BOIL!!!

SLICE pudding (warm or cold) into half inch thick slabs and spoon sauce over it.

REALLY YUMMY!!!! 


Two pieces is the normal serving ;)


@@@This is very important. The pudding needs the foil to keep the STEAM in. One of my aunts made it and didn't do this step. She told my mom that it turned out horribly.

***This is another important step. Boiling makes the sauce totally weird. Just heat it until the butter is melted, that's all. 


My hubs will eat a slice, but since there's no chocolate, he'd rather pass. But I'm giving this a FIVE CHERRY Rating anyway, because the rest of is like it enough for him:


Monday, December 9, 2013

Easy Butter Shortbread

The Christmas baking has begun. Bethany needed several large cookies for gifts for the second year radiography class. They've been very helpful to the first years. These are really easy...and so good! I've had this recipe for years. Can't even remember where we got it.


Easy Butter Shortbread


1 cup butter
2/3 cup powdered sugar
2 teaspoons vanilla
2-2 1/4 cup flour
1/8 teaspoon salt

PREHEAT oven to 350 degrees.  In a medium mixing bowl CREAM butter, sugar and vanilla.  ADD two cups flour and salt and MIX until dough is smooth.  If dough feels sticky ADD additional 1/4 cup flour as needed.  Dough should be soft but not sticky.  ROLL into 1" balls and place on ungreased cookie sheet.  BRUSH cookie press lightly with vegetable oil.  PRESS dough with desired cookie presses.  BAKE 10-12 minutes or until golden brown.  COOL 5 minutes on sheet, COOL completely on rack.


Makes 2-3 dozen…and I ALWAYS make a double batch!


After you oil the press, be sure and dip it in sugar to keep it from sticking to the cookie dough. You can use plain white sugar or colored crystals.

When we double the recipe, we use 1 Tbl Vanilla and 1 tsp Almond flavoring

When we made them today, I rolled short logs that were about 1.5 inches thick by about 8 inches long in wax paper. Then Bethany and I rolled the logs in multi-colored sprinkles. We then sliced them into 1/2 inch discs. THEN we squished them with an assortment of cookie presses. They were quite colorful! You can see the sliced discs, along with the presses, here:


Tuesday, October 29, 2013

Halloween Party Snacks


We had a Halloween Party this past weekend. The girls hosted a murder mystery, written by Bethany, and a costume party. Lots of fun was had by all.

And lots of snacks were eaten!


I thought the Mummy Dogs were very cute...and so easy.

We used one package of Pillsbury Crescent Rolls and cut the dough into very thin strips. We wrapped the strips around hot dogs that we had cut in half. We were looking for finger food, not an entire entree. Then Delaney used a toothpick to put green food color eyes on the mummies. Baked them at 375 for 12-16 minutes. The hot dogs were Cheddarwurst, Beef, and Turkey dogs. The Cheddarwurst sort of "blew out" which made them even creepier looking!


Also on deck were Monster Eyeballs... Devilled eggs with green olive eyes! To add an extra measure of creepiness, I let the peeled hard boiled eggs sit in a some red food coloring with white vinegar for a few minutes.


To top the evening off, Amanda and I made Broken Glass Cupcakes! We've seen several of these posted at Pinterest and we used portions of EasyBaked's Recipe for the most part.
For the glass, we used almond flavoring.
I think if we made it again, we'd spray Quick Release Aluminum Foil instead of waxed paper. 
Don't they look yummy? And they really were easy.


Sunday, September 22, 2013

Peel off Facial Mask Recipe


Have you ever used those peel off nose and chin strips? The ones that Biore sells? They are a pricey little facial care item.

I remember trying to come up with something similar years ago, but didn't have any luck. I even tried white glue, but it didn't work that well.

I recently saw a whole bunch of "recipes" for a peel off mask...one that actually works!

1 tablespoon unflavored gelatin
1 tablespoon milk

I had some gelatin on hand, so tried it.

It works!

BUT...it smells hideous...like, GAG ME hideous.

I perused the posts in search of something to make it nicer. Some mentioned using "essential oils" and "tea tree oil" as helpful.

I didn't have any of that, but I do have some MINT extract.

So, I added a few drops of MINT EXTRACT to the mix.

Ahhhh...lovely! It makes the mask feel rather "zingy" and it smells nice, too.

To make this, I use a small plastic bowl. I put the gelatin, milk, and extract in the bowl and mix it with a spatula. Next I zap it for 10 seconds in the microwave and then take it out and swirl it around to mix it.

I zap and swirl three times.

It's going to be HOT and it should look kind of like yellow-ish Cream of Wheat.

Standing before a mirror, I use my fingertip to apply it to my nose and chin. It's drippy, so be aware.

DO NOT GET in your EYEBROWS or HAIR. A young friend put it ALL OVER her face. Ouchie! It will pull hairs OUT!

Once I get my nose and chin covered, I let it set for just a moment and then I apply another coat. The reason I put TWO coats is so that it's thick enough to peel. One THIN coat tends to come off in little shreds. Two coats peels off nicely.

I get my kindle and read for about 20 minutes until the mask is good and dry.

You'll know it's dry enough when you smile and you feel it cracking. Yes, fun stuff!

Then comes the fun part! Peeling it off!

Once you've peeled it off (and looked at the little forest of ICK that comes out of your skin) you should rinse with cool water to get any remainder off.

Your skin will feel smooth and look so nice!

Now, I've read where some people put this over active acne. I'm not sure that I'd do that. It's one thing to pull out blackheads, but an active acne outbreak might not take well to this treatment.

If you have lots of the mix left, leave it to dry and then a couple days later you can add a few drops of water and reheat it in the microwave. We tried that it and it worked fine.

I read that you can use any kind of milk, including almond milk.

I want to find some lavender oil. I bet that would make this even nicer than the mint!
 
This gets a FOUR OUT OF FOUR from us.
(Hubs declined to try it)
 

Side note: Amanda likes to do zombie makeup. This stuff makes the best scars! She built it up on her forearm, added some acrylic paint...and voila! ZOMBIE BITES!


Side note #2: You know those itty bitty splinters that you just can't catch with tweezers? If you put a couple coats of this on the area where the splinter is, let it dry, then pull it off, you can usually get the splinter out.

Side note #3: I saw that you can use flavored JELLO...but the color may leech into your face! So, unless you really want to be Strawberry or Lime colored, I'm not sure that I'd do that!

Friday, September 20, 2013

Creamy Salsa Chicken

.
Creamy Salsa Chicken

This is a really easy crockpot recipe. And incredibly tasty! Amanda got it off a share on Facebook. We added the pineapple because we like that sweet element.

Lots of ways to tweak this one for your own family, too. If you like it spicier, there are lots of ways to fire it up.

Ingredients:

Chicken (we used a 40 oz bag of frozen chicken tenderloins)
1 24 ounce jar of Salsa (we used a mild variety)
1 small can chopped mild chiles
1 can cream of chicken soup
1 can of pineapple, crushed or chunks, with the juice


Place your chicken in the crock pot. We didn't even thaw the tenderloins.
Pour the ingredients over the chicken.
Let it cook on high for 3-4 hours or on low for 6.
Stir occasionally after the first two hours.

Shred the meat before serving.

Serve over rice.

Easy! And so good.

A Five out of Five from the Family:


You can use whatever chicken chunks your family prefers. You can use any heat rating of salsa and chiles. Yep, lots of ways to tweak this one!

Sunday, September 1, 2013

Pecan Sticky Buns

.
 
I recently posted a recipe for One Hour Cinnamon Rolls.

This is the Pecan Sticky Bun Option for that recipe. I cut about eight rolls slightly smaller than the regular buns and place them in the prepared pan. Some of the family likes them with the icing, and some prefer this sticky confection.

The last time I made these, I only did a half recipe as we really didn't need to eat 44 rolls, which is how many the full recipe made.

Here's the half recipe with the Pecan Sticky Option following:

Mix and let sit for 15 minutes:
1 3/4 c. warm water (110° F)
1/4 c. + 2 T. white sugar
1/4 c. canola oil
2 T yeast

Then add:
1 1/2 tsp. salt
2 eggs
6 c all-purpose flour (keep more available in case it's really sticky)    

Cinnamon-Sugar:
1/2 c. white sugar
1 1/2 tsp. ground cinnamon

Mix together by hand for 10 minutes, then let it sit for 10 minutes. Oil counter** and dump out dough. Divide in half. Roll one half out into rectangle. Spread with ¼ c. melted butter and then sprinkle with cinnamon-sugar mixture. Roll up tight, but not too tight. Divide each portion into 12 to 16 rolls and place on greased cookie sheet. Repeat with other half of dough. Let rise. Bake for 12-15 minutes at 400.
 
Spread with icing while warm:
 
Icing
1/2 stick butter (1/4 c.)
dash of salt
1 tsp. vanilla extract
3 c. confectioner's sugar
milk to desired consistency

For the Pecan Sticky Buns:
1/4 c packed brown sugar
1/4 c softened butter
3 T light corn syrup
1/4 c chopped pecans

Grease round cake pan
Blend sugar, butter, and syrup well, and then spread in the prepared pan
Sprinkle with pecans
Place 6-8 cut rolls into the pan. Don't crowd them.
Bake @375 for 12-16 minutes or until deep golden brown
Remove from oven and place a plate over the pan.
CAREFULLY invert the plate covered pan
Wait 2 minutes then remove the pan

**I oil a cookie sheet and place half the dough on it, pressing it out with my fingers. Then I spread the butter and sprinkle the cinnamon sugar on it. I then roll the dough toward me. I use SCISSORS to cut it into rolls. Much easier than a knife.

You can also do this in a muffin pan, but it's much messier than in the cake pan.
I wasn't careful enough at flipping them over last time...and they slipped off the plate! Good thing I had just wiped the stove down just prior to removing them from the oven! What a MESS! I took a spatula and scooped them back onto the plate. Will be much more careful next time.

Friday, August 23, 2013

Pork Chops and Beans

This is one of my husband's favorite meals.

This is also one of those recipes that I've tweaked practically every time I've made it. You can tweak it to suit your family, too. For instance, if you aren't fond of pork chops, you can use chicken (legs, thighs, tenders, etc.). If you don't like kidney beans, then just use all Ranch Style Pintos. Totally up to you.

Pork Chops and Beans


Splash olive oil
1/2 cup chopped onions
6 pork chops
3 cans Ranch Style Pinto Beans
1 can kidney beans
1 can black beans
1 small can mild chopped green chilies
1 can chicken broth
1 cup barbecue sauce (I use whatever kind happens to be open in the fridge)
1/4 cup prepared mustard
1-2 tablespoons minced garlic (why yes, I do buy the large economy sized jars!)
salt and pepper to taste (we use Montreal Steak Seasoning)

I use a large electric skillet to prepare this meal

Heat oil in skillet
Brown onions and pork chops
Mix the mustard, barbecue sauce, broth, minced garlic, and chiles with two cans of the beans and pour over the chops in the skillet
Add the remaining cans of beans and stir to mix
Let simmer until the pork is tender and done, about 45 minutes
Stir occasionally to avoid sticking
Serve with a nice green salad

You can mix and match beans, but I'd use at least two cans of the Ranch Style Pintos.
Omit the chiles if the family doesn't like them.


I'm going to give it a rating of FIVE, but have to confess that two of the children will only eat the beans and one will only eat the pork! So that evens out to FIVE, right?

Wednesday, August 21, 2013

Microwave Caramel Corn

Fifteen years ago a lovely friend, Debbie Burgett, gave me a recipe for Microwave Caramel Corn. This stuff is heavenly! It was medicinal during some edits that I've done. Got me through them. I'd edit a couple pages, grab a handful of this, pace around the house...then get back to editing. Yep, medicinal!

This is the closest thing to Cracker Jacks that I've ever seen. I think it's the baking soda that makes the kernels separate.


Debbie Burgett's Microwave Caramel Corn

2 bags microwave popcorn (we use the air popper and guesstimate amounts)
1 1/2 cups of peanuts (optional)
1 cup packed brown sugar
1/2 cup butter
1/4 cup corn syrup
1/2 tsp salt (we don't add this)
1/2 tsp baking soda
 
Pop corn and place half in a large brown paper bag
 
Combine butter, sugar, syrup and salt in a large microwaveable bowl
Microwave on high for 3-4 minutes, stirring after each minute
 
Once it comes to a boil, microwave for two more minutes
 
Remove from microwave and stir in baking soda
 
Pour half of the mixture over the popcorn in the bag
 
Put the rest of the popcorn in the bag and cover with the remaining mixture
 
Close bag and SHAKE WELL
 
Microwave for 45 seconds and SHAKE again
 
Microwave for 45 seconds and SHAKE again
 
Microwave for 45 seconds and SHAKE again
 
Pour into a roasting pan
 
Cool and stir to separate kernels
 
YUMMY!
 
WARNING: The butter, sugar, and syrup mixture is VERY HOT. BE CAREFUL when pouring it over the popped corn. I try to make sure that I don't get any on the SIDES of the bag. It's never happened, but I worry about the bag catching fire. Nope, hasn't happened, but I worry anyway.
 
Options:
 
Add cereal to the popcorn. Quaker Oat Squares are a yummy alternative.
MIXED nuts makes a fun crunch.
 
HALF this recipe is more than enough for two hungry people.


Saturday, August 17, 2013

Creamy Shrimp Stir Fry

A couple years ago I was handed a really good coupon for a Philadelphia Cream Cheese cooking sauce. I made a shrimp dish with it. It was yummy. BUT, the prepared sauce base is kind of pricey. So, of course, I tweaked around and came up with my own version of it. As always, if there are some ingredients that you or your family won't eat, substitution is allowed...and encouraged!
 
Bethany helped me make this today.


Creamy Shrimp Stir Fry

splash of olive oil
4 tablespoons Smart Start or Butter
2-3 small fresh yellow squash (sliced) or one package frozen (thawed)
2-3 smallish zucchini (sliced)
2-3 red or orange bell peppers, chopped
12 ounce bag frozen shrimp (thawed)
8 ounce Philadelphia Cream cheese (we use the LIGHT)
1-2 tablespoons minced garlic to taste
salt and pepper to taste
1 package egg noodles cooked according to package

Heat a good splash of olive oil in a deep frying pan. Mine sort of looks like a Wok.
Saute your zucchini, squash, garlic and chopped peppers in the oil.
Add the butter and let it continue cooking until the veggies are done enough for your family.
Turn the heat down to medium and add the shrimp and cream cheese.
Season to taste with salt and pepper.
Stir to combine.
DO NOT LET THIS BOIL. Boiling cheese products tends to make them separate and it is very unappetizing.

Serve over egg noodles or rice.

Options:

Use all squash or all zucchini (today's picture is all squash)
Use assorted colors of bell peppers
Use chicken (cooked) instead of shrimp
All of your veggies can be fresh, or they can be frozen


My family loves this.
It is a FIVE out of FIVE from us:

Wednesday, August 14, 2013

Follow me via Bloglovin!


I'm setting this blog up with Bloglovin, you can join me via them! There's a button on the upper right...


<a href="http://www.bloglovin.com/blog/10326529/?claim=bbj5asr66h4">Follow my blog with Bloglovin</a>

Tuesday, August 13, 2013

Chicken Enchiladas

We quite often get one of those rotisserie chickens from the commissary. In fact, we sometimes get two. One to eat right away and one to pick the meat off to go into a family favorite, chicken enchiladas.

I've made this recipe so many times, I don't even have to hunt the printed copy down. All of the girls know how to make it, too. If you don't want to use the rotisserie chicken, you can just cook some breasts, boneless thighs, or tenders and shred them. I find that if you are going to cook the chicken yourself, boiling the meat with the bones and just a bit of skin gives the meat a better flavor.


Chicken Enchiladas

Heat oven to 350
Grease a 9x13 baking pan

2 cans cream of chicken soup
8 ounces sour cream (we use the light)
2-3 cups shredded cooked chicken meat
1 small can mild chopped chilies
1 cup shredded cheese, separated
10 soft flour tortillas (we use the plate sized ones)

In a small bowl mix the soup, sour cream and 1/2 cup shredded cheese.
Put about 3/4 of that mixture in a larger bowl and set the smaller bowl aside.
Add the chicken to the mixture in the larger bowl and combine


Place a thick line of the mixture on the tortilla, roll it up, and place it in the greased pan. You can make them fit pretty tightly.

Once all the tortillas are filled and rolled, take the small bowl of filling and cover the tortillas. Make sure you get the filling clear to the edges.

Sprinkle with the rest of the cheese. I didn't specify what kind of cheese to use. Just use whatever kind you like best. When I made this today for my husband's birthday, we used a mix of four different kinds.

If your family likes things more cheesy, use more!

Bake for about 30 minutes. The edges should be a bit bubbly and the cheese should be nice and melty. This doesn't really need to be cooked; it just needs to be heated all the way through.

You can adjust how much filling goes in each tortilla. You can choose to make them a bit leaner...or a bit plumper. Totally up to you.

Sorry, forgot to get a picture when it was done. Will add one the next time we make it!

This one gets a FIVE from the whole family:

Sunday, August 11, 2013

Easy Chocolate Sauce

Easy Chocolate Sauce

A very long time ago, when my mom lived in Seattle, she had a "Banana Split Dessert" at a friend's house. When we came to visit, she made it for us. While the bananas and ice cream were tasty, it was the sauce that was over the entire thing that made the biggest impression on us.

Since then, we've made just the sauce many, many times. We ladle it over Angel Food Cakes. We drizzle it over a cake that has vanilla frosting. One time a child chose chocolate cake, with chocolate frosting, with chocolate sauce  for her birthday cake!

Once I used it in a medicinal way. Delaney was a wee babe and it was time for her to learn to fall asleep on her own. As she lay grizzling away in her crib, I made a pot of chocolate sauce and ate it by the spoonful while she learned to sleep. Yes, it was medicinal.

Today is Delaney's Child of God Day. That's the anniversary of her Baptism Day. The girls get to choose dessert for their Child of God Day. Delaney chose CHOCOLATE SAUCE. She suggested we just eat it with spoons. Bethany pointed out that we have bananas and pineapple slices. Therefore we sang "Jesus Loves You" and had chocolate sauce with fruit. It was a good dessert.


Chocolate Sauce

1 cup chocolate chips

½ cup butter

2 cups powdered sugar

1 ½ cups evaporated milk

Melt chocolate chips and butter.  Add powdered sugar and evaporated milk.  Cook until thick and smooth, stirring constantly.

Remove from heat and add 1 tsp. Vanilla


We cook it in a heavy cast iron skillet over medium heat.

This is great over ice cream, too.

This is a family rating of:

Wednesday, August 7, 2013

Molasses Oatmeal Whole Wheat Bread

My first recent attempt at bread in the machine was the King Hawaiian Bread. It turned out great but I wanted something more "food" like. Something a bit more robust. Maybe with a bit of fiber, too. Hubs has been reading about quinoa flour. Quinoa is pronounced "kinwa." It adds protein to your baking. It's a bit pricey, but we thought we'd give it a try. Let me state for the record that we'll never be using this in any large amount. The aroma and flavor is something like peas, mixed with RAW garbonzos, with a slice of something, grass, maybe? and it's not my idea of yummy. BUT...I feel all healthy-ish when I add a scant 1/4 cup to this bread recipe. The molasses and oats override the flavor. I wouldn't use it in the KHB, though. That flavor is quickly overwhelmed by the quinoa.

I'll say it now, the whole family LOVES this bread.


Molasses Oatmeal Whole Wheat Bread

2 cups of flour (I use all purpose, unbleached flour and never have a problem, but some swear by BREAD flour)
1 1/4 cup whole wheat flour
1/4 cup of quinoa flour (if you choose NOT to use this, just up the whole wheat flour by 1/4 cup)
1 package of yeast (2 1/4 teaspoons of the loose variety)
1 cup warm water
1/2 cup quick oats
1/4 cup molasses
3 tablespoons of butter, softened
1/2 teaspoon salt
1 egg

I add all of the wet ingredients first (water, molasses, butter, egg). Next, I add the dry ingredients and then I press a dimple into the flour with my finger. This is where you place the yeast.

If we want the bread during the day, I use the rapid setting on the bread machine and we have bread in 2 hours and 50 minutes. I've also set this to be ready at 5:30 in the morning. Some worry about the egg sitting in the machine for that long, but I've never had an issue with it.


Since my loaves tend to be tall, I cut them in half, then cut starting at the corner. Makes for even, although not equal, slices.  This is particularly good toasted.
After we slice it, we store it in the refrigerator in a zip-lock bag. With no preservatives, this will mold on the counter...if it lasts that long! 

Yes, the family rating for this is:


Saturday, August 3, 2013

Roasted Veggies

At one of the Chinese restaurants that our family likes to visit, they have these green beans that are heavenly. Kind of crispy and roasted, with some garlic bits stuck to them.

A google search and I had the basics of making some of my own. When I shared a post on Facebook that a friend had posted, I was told that ANY veggie can be roasted. You know I had to try it.

I've roasted fresh green beans twice and frozen ones twice. And they all disappeared quickly.

Today I'm trying frozen broccoli and a yellow squash. It smells so good! This is going to be one of those recipes where nothing is set in stone...or measured out exactly.


Roasted Veggies

A bag of frozen broccoli (or a stalk of fresh, cut into pieces)
One medium yellow squash (or a zucchini!) sliced thin

In a bowl mix together about 1/4 cup olive oil and a heaping tablespoon of minced garlic (and I did use a TABLE spoon, not a measuring spoon. You can add more or less garlic to taste. We LOVE garlic, so the more, the better)
Put a couple "grinds" of sea salt and fresh pepper (I have a salt grinder AND a pepper grinder)

Toss the veggies in the oil mixture and spread on a cookie sheet
Sprinkle with "some" Parmesan cheese, use your best judgement about how much ;)

Bake at 375 for 30 minutes
Stir the veggies around at 15 minutes


Now, you can use ONE kind of veggie or mix and match. I've used fresh green beans and also a bag of frozen. It was all good. This combo (the broccoli and yellow squash) was quite lovely.

My best guess is that if you use FRESH brocoli, the pieces would be more "crunchy." But I have to say, this with the fresh squash and frozen brocoli was really tasty.


The Family gives this
FIVE out of FIVE!

Thursday, August 1, 2013

King Hawaiian Bread

 
Although I've owned a bread machine for something like fifteen years, it's been living in a cabinet in my garage for about fourteen of those years. I've moved it from Germany to Oklahoma, to Florida, and then to two more houses in Oklahoma.

A recipe for King Hawaiian Bread, made in a machine, caught my attention recently and I pulled the dusty machine out. Got it all cleaned up...and made bread. That was about twelve loaves ago!

There really is nothing like the smell and taste of fresh, hot bread.

The recipes that I saw for KHB were all white and I wanted to give ours a bit more "food value" so I (say it with me) tweaked the recipe.

King Hawaiian Bread

1 cup warm water
1/2 cup sweetened condensed milk (you can use low or no fat, but I use the REAL stuff)
2 tablespoons butter
2 cups white flour (I use unbleached)
1 1/3 cup whole wheat flour
2 1/4 teaspoons yeast

I put the wet ingredients in my bread machine first
Next I put the flours
Last, make a dimple with your finger in the flour and put your yeast there

Because we can't wait, I use the "rapid rise" setting on my Hitachi Bread Machine and in 2 hours and 50 minutes we have a fluffy, yummy loaf of bread.

To cut it in manageable pieces, I lay it on it's side and cut it in half. Then I start cutting at a corner and make slices. Yes, this won't make nice even pieces for sandwiches, but we don't mind eating odd shaped ones!


The family rating for this is...
 
FIVE OUT OF FIVE!

I'll be posting my Whole Wheat Molasses Oat Bread in the next day or so. It's yummy, too!

Monday, July 29, 2013

Eggs


We have a small flock of chickens. I sell a couple dozen eggs a week. And we eat eggs all the time. We use them in baking, potato salad, fried for sandwiches, and hard boiled. We feed the goldfish in the koi pond a yolk every month. The dogs get them, too.

One thing about a fresh egg, as opposed to the ones you get from the store which may be up to three months old, it is almost impossible to peel a hard-boiled FRESH egg. At least that's what I always thought. I mentioned this to one of my elderly egg buyers. She scoffed and said, "Of course you can peel a fresh egg! You just have to crack it first. My Grammy taught me that trick."

Crack it? I was sure she was nuts, but being a home school family, we followed her directions, and sure enough...you CAN peel a fresh, hard-boiled egg!

The secret is cracking the egg on the large end. You just tap it on the counter until you hear the CRACK. Don't do it hard enough to smash it, just enough to crack it. The large end is where the little air pocket is.

I asked Annie if the white would ooze out. I hate it when it does that...shudder. She assured me that it wouldn't.

The home school students immediately cracked several eggs...lightly...and placed them in the pot of cold water. We watched over the pot as it came to a boil, waiting to see if the white would ooze. Nope, not a bit of it came out.

We boiled the eggs for 11 minutes, then rinsed them in cold water. We each took an egg and cracked it all over.

THEY PEELED LIKE MONTH OLD EGGS!

We were VERY impressed. I was so impressed that I gave Annie three dozen eggs for FREE the next time she came by.

Caveat: We have one hen whose egg just won't peel nicely, though. Not sure who she is, but one brown egg still doesn't peel well. But all the rest, little white bantam eggs, green Americana Arucaunas, and the other brown eggs all peel very neatly and easily.

I used an egg wedger for years. I got it in Germany and the girls and I enjoyed making egg wedges with it. It finally broke a couple of months ago. Hubs, being the great guy that he is, found a slicer/wedger and ordered it for me. I love it!


Here's a link if you want one for yourself - Egg Slicer Wedger Piercer.


The Egg Skelter

This is another nifty thing that Hubs got me for Christmas this year. It keeps our eggs in order of lay. You just take the one off the end (in this case, that big green one) and the rest roll down. I love it! It holds two dozen eggs. The only drawback is that the bantam eggs don't work on there. They are smaller than the others and will "clog" the roll...so they go in a bowl beside this wonderful gadget.

Sunday, July 28, 2013

Crock Pot Orange Pineapple Chicken

We all love Orange Chicken, be it from Panda Express or from the deli counter at Walmart. When I saw several recipes for it on Pinterest recently, I knew that we had to try it. Those glazed chicken pictures just called to me. They all look like Panda Express Orange Chicken. While reading the recipes, I realized that without battering and deep frying, the recipes won't turn out like the pictures, not if made in a crock pot! I was intrigued by the idea of using concentrated orange juice as the base of the sauce, as directed by many of those recipes.

Now, this is BIG...This recipe doesn't make that kind of Panda Express Orange Chicken. This is WET chicken, not deep fried or battered, and it doesn't end up glazed. So, while it isn't Panda Express Orange Chicken, it IS good and tasty.


CROCK POT ORANGE PINEAPPLE CHICKEN

Ingredients:
 
4 thighs with skin and bones (You could use all thighs, all tenderloins, or breasts)
8-10 chicken tenderloins
3/4 cup baby carrots
3 stalks celery, sliced thin
2 large red, orange or green bell peppers (I didn't have any when I first made it, dang it!)
3 cloves garlic, minced
1 can Mandarin oranges, with the juice
1 cup pineapple chunks
1 tsp ground ginger
1/2 tsp pepper or to taste
8 ounces orange juice concentrate, thawed
**You could even add a splash of soy sauce for a more Oriental taste, maybe even a dash of Sesame Oil
 
Place the chicken chunks in the bottom of the crock pot and then put the fruit and veggies on top
Mix the orange juice concentrate with the spices and pour over the fruit and chicken
Cook on low for 6-8 hours or on high for 3-4
 
We served it with Jasmine rice.
 
This gets a FOUR out of FIVE on the Family Rating
as one child was not fond of it:
 

Saturday, July 27, 2013

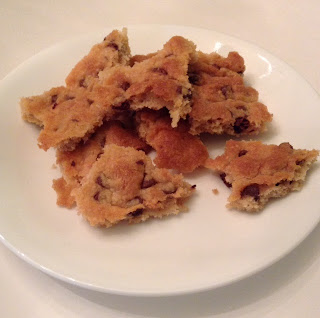
Chocolate Chip Cookie Brittle

Our family loves chocolate chip cookies. It's probably the first recipe that my children ever really helped me with. And who can blame them? They snuck chocolate chips as we mixed and spooned the dough out.

With all the White Texas Sheet Cake, Meringues, and BREAD that I've been making lately, hubs has felt like we've been missing out on one of the main food groups: CHOCOLATE.

So today I'm giving CHOCOLATE CHIP COOKIE BRITTLE a shot. I was surprised at how easy the recipe was. No eggs, either! I was surprised that there wasn't any brown sugar, but then decided that when I make it again I'll substitute BROWN SUGAR for the white. Yep,  haven't met a recipe that I can't tweak!

Now, Nestle has a recipe for this one. You can find it here.  I've omitted the nuts (see? TWEAKING!) because I'm the only one in the family that really likes nuts in anything besides Baklava. You could add nuts if you like. You could also use any flavor of chips you prefer, or you could mix them up! This is easy...and fun.

Chocolate Chip Cookie Brittle

Preheat oven to 350 degrees. Line a 15x9 cookie sheet with parchment paper.

1 cup (2 sticks) butter or margarine, softened
2 teaspoons vanilla extract
1 cup sugar (I'm using BROWN next time!)
1 teaspoon salt
2 cups flour
1 1/4 cups chocolate chips (I think that I'd use mini choc chips next time)
 

Mix the butter and vanilla
Add in the flour, sugar, salt and chocolate chips, using your hands, until combined 
 
The dough is pretty dry and crumbly
 
Place the dough onto lined cookie sheet
 
Using your hands, press it into a thin layer (I read one recipe that said to press it BETWEEN two sheets of parchment paper, and ROLL it thin. I'll be doing THAT next time)
 
The thinner you press it, the more brittle like it will be  
 
Bake for 20 minutes; check it at 15, see if the edges are lightly brown and center is set. You don't want to overcook it, although I'm quite fond of really DARK cookies. The rest of the family prefers them to be less crunchy.
 
 
Cool completely
 
Break into pieces to serve and enjoy!

 
Family Rating:


Friday, July 26, 2013

White Texas Sheet Cake


White Texas Sheet Cake


Before I made a Texas Sheet Cake to take to the therapy riding stable we volunteer at, the family and I went to see PACIFIC RIM. I didn't know a lot about the movie. All I heard was that it was a combination of GODZILLA and TRANSFORMERS. I like action movies and I liked both of those movies, so this seemed like a WIN.

OH MY GOSH WAS IT!
Non-stop action...CUTE Guys...ROBOTS...MONSTERS...EXPLOSIONS...a TOUCH of ROMANCE. Yep, this had it all. I guess it isn't doing so good in the box office and I'm not sure why. It had all those SUMMER FUN aspects. In fact, I think I have to see it again! There was just so much happening, that I think I missed some of it. Yes, it was good fun.

Okay, on to the cake. Last week I saw a recipe on Pinterest that looked pretty good. The blog post was a riot and she really sold me on the cake. Her recipe is slightly different than mine, because, you know I had to tweak it to suit the ingredients I had on hand.

I don't think it hurt this at all. WE LOVE IT. And I'm pretty sure the kids at stable are going to love it too.

You really should read the blog post where I got this. It may tickle your funny bone, too:

Fudgy Vanilla Brownie
Author: 

My Tweaked
WHITE TEXAS SHEET CAKE recipe:


Heat oven to 350

Grease and flour jelly roll pan (9x15)

Cake:

Mix together in a large bowl and set aside:
2 cups flour
2 cups sugar
1 tsp salt
1 tsp baking powder

In a small pot, melt together over medium heat and bring to a boil, stirring often:
1 cup butter
1 cup half and half (original recipe called for heavy whipping cream, which I didn't have)

To the flour add:
1/2 cup Greek yogurt (recipe called for sour cream, which I didn't have)
2 large eggs, beaten
2 tsp almond extract
1 tsp vanilla extract (original recipe called for 1 tsp almond, not nearly enough for our tastes!)

Pour the hot cream/butter into the flour mixture and stir to combine.

Pour into prepared pan.

Bake at 350 for 22-25 minutes until a toothpick comes out clean.

Prepare frosting:

1/2 cup butter, softened
1/4 cup milk
3 cups powdered sugar
2 tsp almond extract
1 tsp vanilla extract (you don't really NEED this much, but we like to TASTE it!)

Spread over warm cake

Enjoy!
 
THIS is a FIVE OUT OF FIVE from the family!
AND the stable family loved it, too:


Updated 8/7/2013

I made another one of these for Amanda's Child of God Day. What's a Child of God Day? Well, since she and my middle daughter share the same birthday, two years apart, we decided that we would celebrate their Baptism Day...not with gifts, but they get to choose the dessert of the day.

Today Amanda chose the White Texas Sheet Cake, but with THREE different glaze flavors. We have the almond, chocolate, and lemon! We just divided up the almond frosting into three bowls and put cocoa in one, and the zest of one lemon and about a tablespoon of the fresh lemon juice.

It turned out YUMMY!
And it's pretty, too!